|
|
 |
himatix.com
The first Point of Sale (POS) Software System for Retail and Restaurant Management with everything available online. |
|
Home
> SELLmatix Help
> Getting Started
> Basic Sample
|
|
Overview and Type of Business |
|---|
|
Before you start working with this Basic Sample configuration, you need to be familiar with the
Software Basic Guide
so that you are familiar with the various components of the software and can navigate your way around
SELLmatix POS and SELLmatix Control.
This is the standard sample configuration that ships with SELLmatix, and is designed to demonstrate a range of features rather than an implementation
that is precisely suited for a particular business.
The closest match to a real business would be a general store which sells a limited range of grocery lines, fruit and vegetables,
along with take-away food and also has a cafe where guests can eat in.
The main product lines sold are:-
- Grocery lines which are scanned using a barcode scanner.
- Office Supplies sold by scanning with a barcode scanner.
- Draft Drinks that are dispensed into paper cups of 3 sizes and cannot be barcode scanned.
- Prepared Foods such as pies and sausage rolls which are pre-heated and displayed in heated cabinets. These items do not have barcodes which can be scanned.
- Food made to order either to take out or eat in the cafe. When these items are ordered, the order is printed on a kitchen printer and the sale is "parked". The
same customer can make subsequent orders in the cafe which are added to the bill, and then when they are ready to pay the bill is printed, the sale retrieved (or un-parked) and then payment is processed.
- Fresh Fruit and Vegetables which can be sold by weight using an electronic scale which is connected to the POS terminal. In this case the goods are placed on the electronic scale, and then the operator
touches the "button" for "tomatoes" or whatever the item is, and the system weighs the goods and charges the correct amount.
Back to top |
| |
|
Installing the Basic Sample |
|---|
|
This sample is the configuration created when you Start a New Sample Configuration in POS and Control.
If you wish to install the latest version of this sample do the following:-
Right Click here to download the Basic Sample
When prompted, choose "Save to disk" and select a location on you computer where you want this backup saved.
Once the download is complete, close SELLmatix Control and in SELLmatix POS:-
- Switch to Menu Mode
- On the File Menu choose Restore to restore the downloaded file as if it was a data backup
- On the File Menu choose Rebuild Databases
- On the File Menu choose Rebuild Indexes
- Close SELLmatix POS
Repeat this step for each POS machine on which you want to run this sample.
On the machine that will run SELLmatix Control:-
- Repeat steps 2 - 4 as on the POS machines
- If you are running POS and Control on the same computer, POS and Control must have different data directories.
- In Connection Manager edit the terminals so that the names or IP addresses for the POS terminals are correct for your installation, and
flag all files to be re-sent.
Restart SELLmatix Control and then run SELLmatix POS on each of the POS terminals, checking that connection manager is able to connect and send all the files to each terminal before experimenting with the sample.
Back to top |
| |
|
Features Demonstrated |
|---|
|
The features demonstrated in this example include:-
- Barcode Scanning to sell items.
- Add On the fly so that the product database can be created while trading.
- Clerk Cards so that operators can "Clerk On" to the system by scanning a barcoded Identity Card.
- Customer Discounts so that discounts can be automatically applied to certain products for certain clients.
- Customer Cards which can be scanned using a barcode scanner rather than entering a custom account number.
- Touch Screen Operation so that items without a barcode can be sold at a single touch.
- Restaurant Operation where orders are printed on Kitchen Printers and the bill settled at the end of the meal.
- Tracking the number of guests served (Covers) in a restaurant sitting.
- Multiple Price Levels so that different prices can be charged at different times of day (or at different POS terminals).
- Intuitive Color Coded display for easy navigation.
Back to top |
| |
|
Navigating the Demo |
|---|
|
When the demo is run, the following screen is displayed.
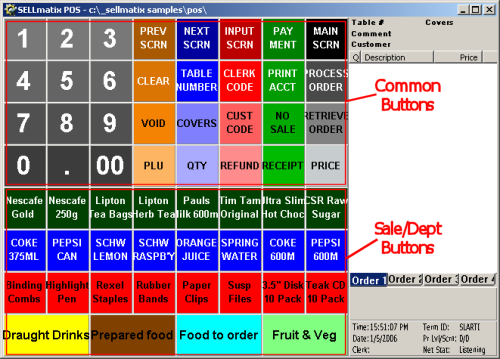
On the top half of the screen are common buttons that appear on almost every screen in the exact same position. These buttons
help you to navigate around the system and perform functions you are likely to need from many screens.
Main Screen Button
The top right button on each screen in this demo is titled "Main Screen". Clicking this button or touching it on a touch screen returns you to this start screen.
The bottom half of the screen is used to sell items and to "drill down" into more specific categories for items. The double width buttons
on the bottom row lead to other screens which are used to sell items which cannot be sold with a barcode scanner because no barcode is printed on the packaging.
For example, touching (or clicking) the Draft Drinks button on the bottom left of the display causes the following screen to display.
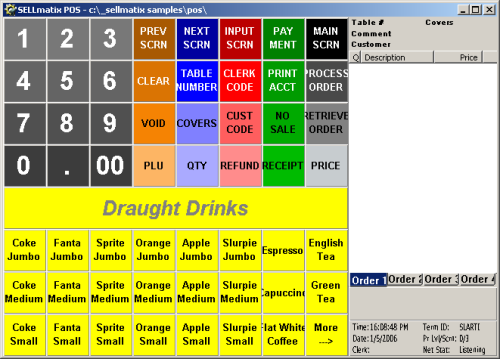
Touching (or clicking) the "Main Screen" button on the top right of the display returns you to the main display.
Take a moment to navigate around the display screens so that you become familiar with how they work.
Bear in mind that with SELLmatix, you can have as many display screens and buttons as you wish.
While any button on any display can perform any function, it makes sense to have similar functions grouped together on the one screen. In this sample, you will see that
a number of payment functions are grouped on the one screen, and similar items are grouped on common screens.
You would not normally set up touch buttons for items that have a barcode printed on the packaging. That would just involve extra work setting up the button, and extra
work by the operator to navigate the screens and find the item. IT is far easier to scan a barcode if that is possible.
Back to top |
| |
|
Your First Sale |
|---|
|
To get an idea of how simple it is to process sales, try the following sequence:-
- Click (or touch) the "Nescafe Gold" button. You will see the item description appear in the sale area to the right along with the price. At the bottom of the Sale Window, the tab titled "Order 1" will change so that the Sale Total is shown.
- Click (or touch) the "Schw Lemon" button. You will see the description added to the sale window and the Sale Total will update.
- Click (or touch) the "Paper Clips" Button. You will see the description added to the sale window and the Sale Total will update.
- Now click the "Payment" button in the top row. You will see the screen change to the Payments Screen which appears as follows.
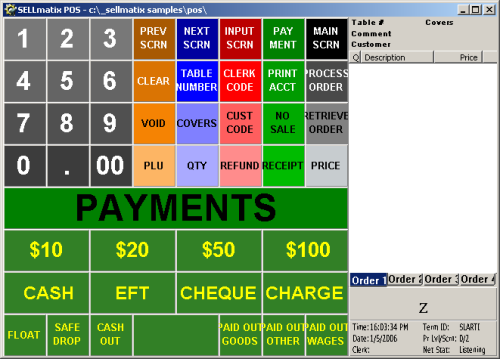
- Now click (or touch) the $20 button. The amount of Change and the amount paid will appear in the Sale Window, and since the sale has been finalised and nothing more is due to be paid, the balance in the Sale Tab at the bottom will disappear and be replaced by "Order 1"
- That's all you need to do. If you want to print receipt and have a Receipt Printer attached, click the receipt button and a receipt will be printed. Receipts can also be set up to print automatically.
What could easier or faster?
Back to top |
| |
|
Using the Barcode Scanner |
|---|
|
To use the barcode scanner, simply scan the barcode printed on the item packaging. If you don't have a barcode scanner, you can
simulate this by keying the numbers printed on the bottom of the barcode, and then clicking (or touching) the "PLU" button.
Unless you are very lucky, the chances are that the item you scanned
does not exist in the product database. This sample configuration is set up so that "Add on the Fly" is enabled to help you build a product database.
Of course if you have a product file this can be imported into SELLmatix, but that is covered elsewhere. When a product is not found and "Add on the Fly" is enabled, the following screen is displayed:-
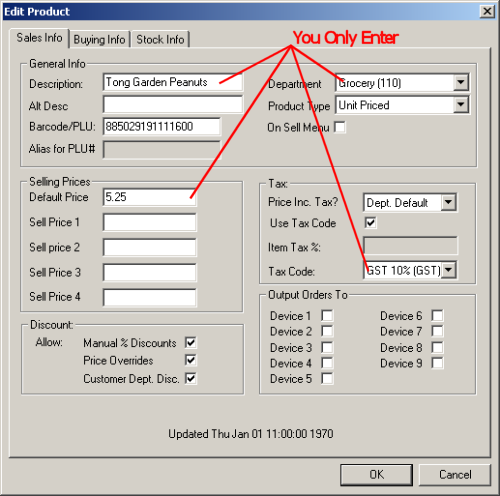
SELLmatix has already entered the Barcode Number for this product. All you need to do is enter the Description, Price and select the Department and Tax Rate.
When you click the OK button, the item will appear in the Sale Window, and next time that you scan the same item, it will sold automatically. Even better, SELLmatix Control will retrieve the details of this product and send the information to all the other POS
terminals so that it can be sold automatically from those POS terminals as well.
This feature can save an unbelievable amount of time entering products if you do not have a product file available. There are no data entry errors with the barcode numbers since the system captures these automatically. If operators only add one product using this method one every sale,
and process the rest of the items on each sale like a department sale on a cash register, the basic product masterfile can be created in a matter of days with no extra expense, and no significant delay in sale processing.
Back to top |
| |
|
Restaurant Mode |
|---|
|
In Restaurant Mode, customer orders are taken on the POS, or on a Pocket PC running PocketPos, then you enter a table (Location) number and click "Process Order".
The order is then passed to SELLmatix Control which prints out any items that need to be printed on the various Kitchen or Bar printers, and stores the order
waiting for any other orders for that table. The POS is free to continue processing other sales and other orders, and when the customer is ready to pay the bill,
the sale is retrieved from Control to the POS and the payment is processed.
In order to operate in Restaurant mode, SELLmatix Control must be running and it must have connected to the POS. In the bottom right of the POS display, the "Net Stat" will show that the POS is "On Line".
Try a Restaurant Mode transaction by following these steps:-
- Touch the "3" button and then the "Table Number" button. On the top right of the screen, the Table Number will be displayed.
- Touch the "Food to Order" button at the bottom of the screen so that the "Food to Order" screen is displayed. These items are flagged so that they are printed on a kitchen printer. Touch the "Tacos" button followed by the "Burger" button. These items will appear in the Sale Window to the right.
- Click the "Process Order" button, and the sale will be cleared from the POS display. Assuming that you have a kitchen printer configured, the order will be printed a few seconds later on the kitchen printer, and the order will appear in the Order Manager Window of SELLmatix Control.
- Let us assume that it is a few minutes later, the dishes have been taken to the Table 3 and now they want an Ice Cream Sundae at the same table. Touch the "3" button followed by the "Table" button.
- Touch the "Food to Order" button and then the "Sundae" button. The Ice Cream Sundae will appear in the Sale Window.
- Click the "Process Order" button, and the Sale will disappear from the POS display and be added to the total for Table 3 on Order Manager in SELLmatix Control.
- Now let us assume that the customer has asked for the bill. Click the "3" button followed by the "Print Acct" button. If you are already processing another sale, this is no problem. You can print an account for any table at any time, and you do not need to "park" or finalise the sale you are currently working on.
At this stage, the sale is still held by SELLmatix Control, and the account will be printed on the printer used for accounts.
- Now that the bill has been taken to the customer, and the customer has given the money to the waiter, you need to process the payment at the POS. Touch "3" followed by "Retrieve Order". The total order will appear in the Sale window, no matter how many items have been added by various terminals. When the Order is retrieved, it is removed from Order Manager in SELLmatix Control.
- Touch the "payment" button and the pay for the sale in the same way you would for any other type of sale.
Practice a few different types of orders in Restaurant mode. Orders can be taken on any combination of POS terminals. You can change a table number by Retrieving an Order, changing the order and then Processing the order again.
You can retrieve an order and process it again as many times as you wish. Processing an Order simply sends it to SELLmatix Control. Control only prints the orders on a kitchen printer the first time it receives the order. If you retrieve the order and process it again, only new items that have bee added will print on the kitchen printers.
Tracking the Number of Guests (Covers)
In some restaurants it is important to track the total number of customers during a sitting. Where this is required, all that is required is to enter the number of guests at the table and then touching the "Guests" or "Covers" button. The total covers is shown on the X and Z Reads.
Back to top |
| |
|
Voiding and Canceling Items |
|---|
|
On old fashioned Cash Registers, you can void the last item on a sale by pressing the Void key, and to Void everything on a sale you would press the Void key repeatedly until all items had been removed.
On a normal sale SELLmatix POS offers the same functionality. In addition, you can void items other than the last item sold by touching or clicking on the item you want to Void so that it is highlighted on the sale display, and then touching the Void button.
For items that are printed on Kitchen or Bar printers, however, once the order has been printed, other staff are preparing the order, so if you just Voided the item from the sale the order would continue being prepared.
In this case, you need to:-
- Enter the table number and press "Retrieve Order"
- When the order appears in the sale display, highlight the item you wish to cancel and press Void.
- The item will then be displayed in Red. If you want to un-cancel the item highlight the item again and press Void, and it will appear as normal.
- Touch the Process Order Button.
- the order will then be sent back to SELLmatix Control, and Control will print an order cancellation on the printers where the order was previously printed.
Back to top |
| |
|
Clerks and Clerking On |
|---|
|
SELLmatix POS allows 3 different Clerking options as follows:-
- Clerks are not required to Log On, but can do so if they wish. This is how this example is set up, and it can be changed by changing POS to Menu Mode and then going to Tools->General Settings.
- Clerking on is required. This option is normally used where one operator only uses the POS and they are accountable for the monies in the cash drawer.
- Clerks need to log in at the beginning of every sale. This is useful if you need to track how much each clerk has processed, however if there is a shortage in the cash drawer, nobody can be held accountable because you can't tell who gave the wrong amounts of change.
Manual Login
Clerks can login manually by entering their Clerk Code and then pressing the Clerk button. While this is adequate in many cases, if the Clerk Codes are known to others, then other people can use their login.
Clerk Cards
In SELLmatix Control, go to Print->Clerk Cards. Follow the default options and print the Clerk Cards (preferably on a Color Ink Jet or Laser Printer).
The page printed can be cut up and laminated to produce ID Cards which contain the name, a photo and a Barcode.
Scan each of the Clerk cards in turn, and note how that the name of the Clerk logged on reflects which Clerk Card has been scanned.
The format of the Clerk Cards can be set up in almost any manner and format that you wish. This example illustrates one method of doing this.
Back to top |
| |
|
Customer Discounts and Accounts |
|---|
|
There are two reasons why customer information may need to be used at the Point of Sale:-
- Certain customers are offered discounts on various categories of product and the discounts need to be applied automatically.
- Certain customers have accounts with the retail store that allow them to charge sales to their account and then settle the amount owed at a later time.
Manual Login
The customer can be logged in manually by entering their Customer Code and then pressing the Customer button. While this is adequate in many cases, if the Clerk Codes are known to others, then other people can use their login.
Customer Cards
In SELLmatix Control, go to Print->Customer Cards. Follow the default options and print the Customer Cards (preferably on a Color Ink Jet or Laser Printer). The page printed can be cut up and laminated to produce ID Cards which contain the name, a photo and a Barcode. This barcode can then be scanned using the barcode scanner at the POS terminal to log in the Customer.
The format of the Customer Cards can be set up in almost any manner and format that you wish. This example illustrates one method of doing this.
"Customer" cards can also be used to handle some types of promotion where a discount is offered to people that present a certain card or coupon containing a barcode.
Caution
You will notice that the infamous law firm of Dewey, Cheetham and Howe that first made an appearance in a Three Stooges Film and have since made appearances in a range of media from Computer Games to The Simpsons, have returned to put in an
appearance in this sample Customer File.
If you are so anal retentive that this offends your sense of political correctness then here is something to
really wind you up.
Seriously, we have received a complaint about including this "customer" in the sample, and it had us laughing for days!
Others may note that this "customer" has had their credit cut off
due to their poor payment record, and can no longer charge sales to their account.
Discounts
Unlike many other POS systems which require that customer information be entered at the beginning of the sale in order for discounts to be applied to items sold, SELLmatix allows the customer to be logged in at any time before the sale is finalised. If the customer is entitled to discounts for various items, the sale is automatically recalculated and the discounts applied.
For example, in SELLmatix Control go to Edit->customers, and you will notice that the conscientious and very hard working accounting firm of Attit, Erly and Layte belong to Discount Group 3. In the Department records (Edit->Departments) you will also note that the "Food to Order" Department allows a discount of 20% for Group 3. In other words this customer receives a discount of 20% on Food to Order.
Process a sale for some of these items and then scan their customer card. (Or enter the customer code followed by the Customer button. ie. 290002.
You will see that their discount is automatically applied. If you then hit the Customer button without entering a customer number, you will see that an "Invalid Customer" warning is generated, the customer details removed from the sale header, and the price returns to the normal price.
Charging Sales
If you offer in store accounts, SELLmatix allows sales to be charged to customer accounts. This requires use of a separate Debtors Ledger accounting program, and you can export account transactions from SELLmatix and import them into a range of other accounting packages.
Charging Sales to an account is as simple as scanning the customer card (or entering their customer account number followed by the "Customer" key, and then finalising the sale to "Charge" on the payments screen.
Please note that SELLmatix can be used for recording customer account transactions. Different Debtor Ledger programs offer different features, and not all of the features of SELLmatix can be used with all debtors ledger programs. Since other transactions can occur in the debtors ledger independently of SELLmatix, there is no way that the POS can accurately know information such as customer balances, and the POS should be used for routine transactions with enquiries and journals being handled in the debtors ledger.
Back to top |
| |
|
Utilities |
|---|
|
This sample configuration offers a range of utilities and features that are used less often than routine sales functions. These are located on
the Input Screen which appears as follows:-
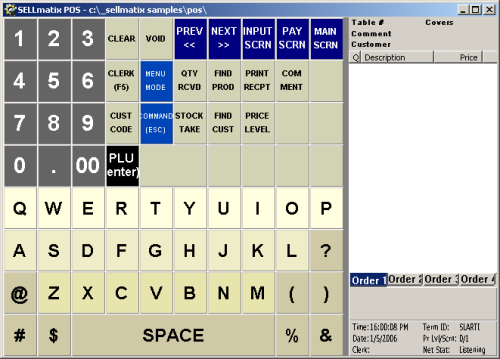
Many POS terminals use Touch Screens and only have a keyboard connected during system maintenance. Even so, there may be occasions where non-numeric input is required, so this screen features an "on screen keyboard".
This screen has more buttons across to provide space for the on screen keyboard.
While some of the buttons at the top of the Input Screen are the same as on other screens, there are some other buttons as follows:-
Menu Mode
Touching (or clicking) the Menu Mode button takes the system out of Sales Processing Mode into Menu Mode where maintenance and device configuration is performed. To return to Sales Processing Mode go to File->Process Sales.
Command
This button allows various system commands to be performed. The most common of these are:-
- 10 <Command> performs a Shift Clerk Report.
- 11 <Command> performs a Shift X-Read for the current shift.
- 12 <Command> performs a Shift Z-Read for the current shift.
- 20 <Command> performs a Day Clerk Report.
- 21 <Command> performs a Day X-Read.
- 22 <Command> performs a Day Z-Read.
Find Product
This function allows you to find a product based on the text contained in the description. Enter some of the text found in an item description and then touch the Find Product Button. The system will then display a list of products that contain the text entered somewhere in the description.
For example entering CE<Find Product> would show the following items:-
- pizza slice
- ice cream sundae
- daily juice orange
- celco paper clips
You can scroll up or down the list and then touch the "Use Item" button in order to sell the highlighted item, or you can press Cancel to abort the operation.
Find Customer
This function allows you to select a customer and works in the same way as the Find Product button. Enter part of the customer name and touch the Find Customer button. You will then be able to Use the Customer or Cancel the operation.
Comment
This function allows you to enter a comment into the sale header. Enter the text of the comment you want to record and touch the Comment button.
Stocktake
With most POS and accounting systems you can't perform a stocktake while the store is trading. The reason is that it is impossible for the system to know whether
any items sold were sold before the stock was counted or after the stock was counted. If an item was sold after the stock was counted, the sale must be subtracted from the stock on hand. If the item was sold before the stock was counted then the sale should not be deducted from the stock on hand.
With SELLmatix, you can perform a stocktake while the store is trading in many cases, because you record the stocktake quantity at the point of sale, and the stocktake is recorded in the transaction stream that passes to SELLmatix Control. When the stocktake transaction is received by Control, it immediately adjusts the stock. Subsequent sales for that item are deducted from the stock on hand when they are received by Control because those sales have occurred after the stock was counted.
You still need to be aware of a situation where a customer has picked an item from the shelves before the items are counted entered into POS, and is still on their way to the check-out when the items are counted and entered into POS. But you can still perform a stocktake within a department while trading is taking place if caution is used and Control is connected to all POS terminals during the stocktake.
To stocktake an item, enter the quantity and then press the Stocktake button. Then either Scan the item or touch the button used to sell the item if a touch button is used.
Please note that entering a stocktake figure changes the quantity on hand for an item to be the quantity entered. Stock received adds the quantity received to the quantity on hand.
Stock Received
To record Stock Received at the Point of Sale, enter the quantity and Touch Stock Received. Then either barcode scan the item, or touch the button used to sell the item, and the quantity received will be added to the stock on hand.
Some of the items in this sample configuration track the quantity on hand, while others do not. It does not make sense to record the quantity on hand for items that are made to order such as meals. If you tried to track the quantity on hand for such items, then the stock levels would quickly become negative unless you recorded a stock received for each item sold.
Some POS systems will not allow you to sell an item if the system thinks that you do not have sufficient stock on hand. While this can be useful in a wholesale business where stock is allocated and then shipped, it does
not make sense in a retail environment. If a customer arrives at the check-out with an item they wish to purchase, then there is sufficient stock on hand to make the sale no matter what the system thinks is available. POS systems that refuse
to process a sale if there is insufficient stock on file cause major havoc for retailers.
Consider a situation where a green widgets run out of stock, and a new delivery of 2 cases arrive. They are sitting on the floor near the check-out and a customer wants to buy three. They are trying to hand you the money and take the goods. But many POS systems won't allow you to process the sale until you enter the stock received (usually on a back office computer).
SELLmatix always lets you process the sale and take the money from the customer, regardless of how many items are recorded as being in stock. If necessary, it allows the Quantity on Hand to become negative, because later, when you have time to record the stock received, the situation will automatically correct.
Price Level
SELLmatix supports 5 different price levels which can be specified on a terminal by terminal basis. Situations where you might want to use different price levels include:-
- Where different prices are charged in different locations. For example, a Hotel might charge one price in the Public Bar, another price in the Lounge Bar, another price in the Restaurant and yet another price in the Bottle Shop. In such cases, you would set the different prices for each product in the Edit Product Screens, and set the POS terminals in each area to the appropriate Price Level.
- Where different prices are charged at different times of day. For example, you might have a "happy hour" where prices on certain drinks are discounted. Or if you have to pay higher rates to kitchen staff late at night, you might have higher prices during those periods.
In this sample Configuration, items in the "Food to Order" department have different selling prices for "Sell Price 1" and "Sell Price 2".
To change the Price Level enter a number from 0 to 4 (zero = default price) and touch the "Price Level" Button.
The current Price Level is shown on the bottom right of the display in the entry
Pr Lvl/Screen 0/3
where in this example the Price Level for this terminal is 0 (zero) and the currently displayed Screen is Screen 3.
It is not necessary to specify a price at each price level for every product, unless the price actually changes. If
the price level is set at Level 3, and there is no price specified for an item at price level 3, then SELLmatix
checks for a price at Price Level 2. If that does not exist it falls back to Price Level 1, and again if there is no
price entered there it falls back to the default price.
Try experimenting with different price levels in this sample. Products in the "Food to Order" department have
different price levels.
Back to top |
| |
|
Summary |
|---|
|
This basic sample configuration demonstrates features that are most often used in SELLmatix installations.
There are of course a number of other features which are important when they are needed, however those features are needed by
a smaller number of sites.
If all of the features you will need have been demonstrated in this example, then you may wish to start making your own configuration as a next step.
If so, you should continue with
Creating Your Configuration
Otherwise it is a good idea to install and play with some of the other
sample configurations
Back to top |
| |
Copyright © 2004-2005, himatix.com
|
|