Installing SELLmatix Software
Links on this Page
Installing SELLmatix POS
Installing SELLmatix Control
Installing SELLmatix PocketPos
Installing Language Packs

First Run of SELLmatix POS and Control
 

Installing SELLmatix POS
`
Stuck? Question?
Name
Reply to Email
Enter Your Question Here
SELLmatix POS is the module which is used to process sales at each Point of Sale terminal. SELLmatix POS requires a minimum of a PC running Windows 2000 or later. It does not run on Windows 95, 98, ME or NT. To install SELLmatix POS you will need to download the file "SELLmatix POS.msi" from the himatix.com download page

The "SELLmatix POS.msi" file which you download is a Windows Installer package which extracts all the files needed to run SELLmatix POS, installs them in the right location, sets up various Registry entries, creates a desktop Icon to enable final configuration, and sets up entries so that SELLmatix POS can be uninstalled using Control Panel->Add or Remove Programs.

To perform the installation you double click on this file. You will need to be logged in to Windows on an account that has Administrator rights.

This installer needs to be run on each machine on which SELLmatix POS is to be used.

Unless you have special reasons for doing so which are beyond the scope of this introduction, you should accept the default options in the installation prompts, without change.

SELLmatix POS communicates with SELLmatix Control which performs all updates, via a TCP/IP network. SELLmatix POS "listens" for connect attempts from SELLmatix Control.

If you have a firewall installed, or depending on your security settings, you may have to configure security to allow incoming connections to be accepted. Unless you specify otherwise, SELLmatix POS listens for connections on Port 20000. You can change this to any other available port should you wish.

Once this installer has been run, an Icon appears on your Desktop that is titled "SELLmatix POS". Double clicking this Icon performs further configuration that needs to be performed the first time that SELLmatix POS is run. For information of first run configuration steps Click Here

Back to top


Installing SELLmatix Control
SELLmatix Control is the module which controls the Point of Sale terminals. This module must be installed on one system only, and this one machine can control up to 64 SELLmatix POS terminals at the same time.

Changes to masterfiles are made in SELLmatix Control which in turn updates all of the POS terminals.

SELLmatix Control requires a minimum of a PC running Windows 2000 or later. It does not run on Windows 95, 98, ME or NT. To install SELLmatix POS you will need to download the file "SELLmatix Control.msi" from the himatix.com download page

The "SELLmatix Control.msi" file which you download is a Windows Installer package which extracts all the files needed to run SELLmatix Control, installs them in the right location, sets up various Registry entries, creates a desktop Icon to enable final configuration, and sets up entries so that SELLmatix POS can be uninstalled using Control Panel->Add or Remove Programs.

To perform the installation you double click on this file. You will need to be logged in to Windows on an account that has Administrator rights.

Unless you have special reasons for doing so which are beyond the scope of this introduction, you should accept the default options in the installation prompts, without change.

SELLmatix Control can be installed and run on the same computer as SELLmatix POS. Unless you only have a single computer, we recommend that SELLmatix Control be installed on a back office machine away from the Point of Sale location(s).

The computer running SELLmatix Control must be connected to the machines running SELLmatix POS by a standard Windows network configuration running the TCP/IP protocol. This is the default configuration when installing a windows network. The underlying network configuration is unimportant. It can be ethernet (most likely), token ring, WiFi or any combination. SELLmatix can run over a VPN via the internet if configured correctly.

SELLmatix Control does not need to be running in order for the POS systems to process sales. It does need to be running in order to update files on the POS terminals, or if orders are to be printed on kitchen printers and accounts run for tables in a restaurant where orders are added from various POS terminals, and paid for at one time when the account is settled.

Once this installer has been run, an Icon appears on your Desktop that is titled "SELLmatix Control". Double clicking this Icon performs further configuration that needs to be performed the first time that SELLmatix Control is run. For information of first run configuration steps Click Here

Back to top


Installing PocketPos
SELLmatix PocketPos (optional) is a module which can be used on a Pocket PC running Windows Mobile 2003 or later.

It is designed to allow waiters to enter orders onto the Pocket PC instead of writing the order on an order pad and taking the order to the kitchen. Orders are automatically sent to SELLmatix Control via a WiFi network connection.

To install SELLmatix PocketPos you will need to download the file "PocketPos.ARM.CAB" from the himatix.com download page

Once downloaded, this file needs to be copied to the Pocket PC using ActiveSync or in some other manner. Once copied, locate the file on the Pocket PC using File Explorer. Double tapping the file will run the installation on the Pocket PC. Please note that the PocketPos.ARM.CAB file which contains the installer, auto deletes itself from the Pocket PC when the installation completes, in order to conserve space.

Back to top


Installing Language Packs
Language Packs (optional) allow you to run SELLmatix where the user interface is displayed in languages other than English.

If you wish to use a non English version of SELLmatix then you will need to download and run installers for the language you wish to use, in addition to the normal installers.

There are a limited number of alternate languages, however additional translations are planned and if your language is not available, then you should contact us to check future availability.

We are particularly interested in hearing from people who are prepared to assist with translation, as this process is not difficult for people proficient in both English and the new language.

To install SELLmatix language packs you will need to download them from the himatix.com download page

Once downloaded, the language pack can be installed by double clicking on the file.

It is important to note that if you have chosen a installation location for SELLmatix which is different from the defaults, that the language packs will also need to use the other location. Language packs are stored in a "language" directory which must be a subdirectory of the one where SELLmatix has been installed. If a different location is selected, then SELLmatix will not be able to find the language pack.

Before installing a SELLmatix language pack, you should ensure that fonts and keyboard support for that language have been installed on the system through Control Panel. If font support for that language is not installed, then text in that language cannot be displayed correctly. Similarly keyboard support is required if non western characters are to be entered.

You can select the language to use in SELLmatix from the Tools Menu while SELLmatix is running. You can even change backward and forward between languages as required. SELLmatix remembers the language in use for each user that logs in to Windows. If two different users use two different accounts to log in to Windows, SELLmatix will automatically remember the language preference for each user.

Back to top


First Run and Config
After running the installers, Icons will appear on the Desktop and the Start Menu to allow you to run SELLmatix. The first time you click on these Icons, installation will be completed.

Note that removing SELLmatix through Control Panel->Add/Remove Programs will uninstall the programs, however it will not remove data files, configurations or shortcuts created after installation.

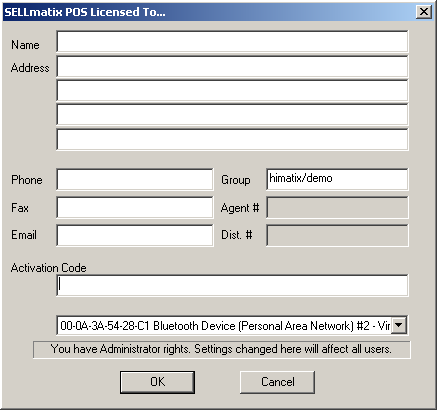
The next steps are the same for both SELLmatix POS and SELLmatix Control. The first time the software is run the following dialog appears:-

License Details Screen
This screen allows you to enter your user details. This information will be displayed on receipts etc. and used for issue of your software license. These details can be changed later, however you must enter some information in the Name field at this time.

Activation options Screen

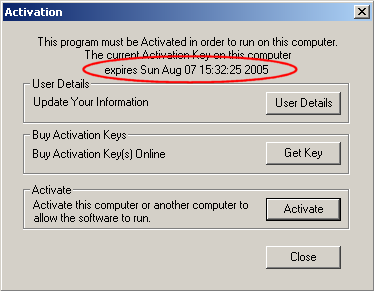
This screen shows the date by which the program must be activated, and allows you to perform activation. For the moment, click the Close button.

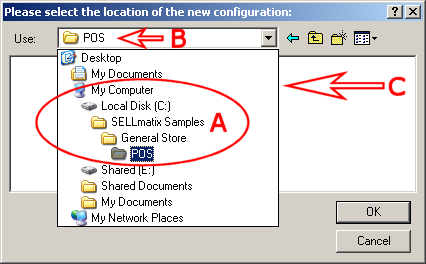
Both SELLmatix POS and Control need a set of data files to work with. Installing SELLmatix programs does not install data files, so the following dialog box is displayed to let you choose where you want your sample data files stored.

Please note that even if SELLmatix Control and SELLmatix POS are running on the same computer, they must both have separate data directories.

Create/Select Destination Directory

Note A To become familiar with SELLmatix, you will probably need to experiment with more than one configuration, because the range of capabilities in SELLmatix is so broad that it is impossible to show everything in one sample.

We suggest that you use a main "SELLmatix Samples" directory, and put each of the sample configurations in that directory. The sample that comes with the program installer, is for a General Store, so you should create a "General Store" subdirectory inside the SELLmatix Sample folder.

Separate directories must be used for POS and Control, so we suggest that you adopt the convention of always using a further subdirectory to indicate whether the folder is for POS or Control. This will greatly reduce confusion later on.

Note B You need to navigate right inside the directory you are selecting, not simply highlight that directory. If this is done correctly, the final subdirectory will appear as above.

Note C In this case, you are selecting a directory into which sample files will be placed. That directory should be a clean directory that does not already contain other files, so the file area will be blank.

Don't select your desktop as the location to store your data files unless you want a screen full off icons which don't mean anything and which need to be removed one by one.

Once you have selected the folder for your data files, the sample files will be copied into that directory and the programs will run normally.

Next step is to review the Software Basic Guide so that you get a feel for navigating around SELLmatix.

If you haven't already done so, why not activate SELLmatix now and start enjoying the benefits of the system now. With SELLmatix, you don't have to pay for everything up front. You can implement the system in stages adding parts as you go from the savings you make. As little as $30 gets you started. No risk. No long term commitment. Activate Now!

Back to top