TOOLS MENU
Links on this Page
Overview

Language

Site Information
General Settings
Keyboard Layout
Calculation Options

Configure Comms

Barcode Scanner
Scale
Cash Drawer

Receipt Printer
Invoice Printer


Overview
The tools menu is designed for configuring SELLmatix Point of Sale. This menu can only be accessed by Clerks who have configure rights. Many of the options on this menu also require that users logged in when Windows starts have Administrator rights.

Accessing options on this menu in the wrong manner will cause SELLmatix to stop working correctly. In general, it is a good idea to stop access to the SELLmatix POS menu commands unless an "administration" clerk is logged in. For more information on stopping access to the SELLmatix POS menu commands, see the SELLmatix Control Clerk Configuration documentation.

Back to top


Site Information
Language Selection Dialog

This option allows you to select the language in use by SELLmatix Point of Sale. Using languages other than English requires the installation of SELLmatix POS language pack for the language you require. Only the language packs installed will appear as options in this dialog.

When a language is selected, the new language is used immediately, and when the OK button is pressed, all menus and dialogs will appear in the new language. If you are unable to understand a language and need to switch between languages, then you should take not of the fact that the Language Dialog is the first option on the second last menu selection of SELLmatix. Otherwise you may have difficulty navigating back and selecting a language you can understand.

SELLmatix language preferences are stored on a per user basis. If one person logs in to Windows as Fred and selects English as their language, then English will be used by SELLmatix POS whenever it is run when the user Fred is logged into windows. Other users will also have their language preferences used.

Back to top


Site Information
Site Information Dialog

This option allows you to enter information about the site that is printed on receipts and reports etc. as well as Software License information. Available information is as follows:-

Name is the name of the retail store.
Address is the address of the store.
Phone is the phone number of the store.
Fax is the fax number of the store.
Email is the email address of the store.
Site ID is made up of two parts being a group name and then a location name separated by a slash (/) character. This information is used in bureau environments for consolidation purposes.

Changing these options requires that the user be logged into Windows with rights as an Administrator on that local machine. If the user has Administrator rights, a message at the bottom of this Dialog will warn that the user has Administrator Rights and that any changes will affect All Users on this computer. If the User does not have rights as a Windows Administrator on this machine, the fields will be displayed, but they will be grayed out, and a message will be shown saying that Administrator Rights are required to make changes to this screen.

Back to top


General Settings
General Setting Dialog

When this menu option is selected, a Dialog Box will appear allowing you to modify general configuration options. The available fields are as follows:-

Clerk Options

  • Clerk On Optional
    If this option is checked, SELLmatix will not require a Clerk to log on. If only one person will have access to the till for an entire shift, or the owner of the store is operating the POS, this option may be appropriate.
  • Clerk must log on.
    If flagged, this means that a clerk must log on and that they will remained logged on until they log off or another clerk logs on.
  • Clerk on at the beginning of every sale
  • If flagged, when a sale is complete, SELLmatix will automatically log off the Clerk, and the Clerk must log in before processing another transaction.
Receipt Message

This is the message that appears at the bottom of every receipt.

Processing Options

  • Only ever open cash drawer at end of sale
    Finalisations (payment methods) include a flag, which indicates if the cash drawer is to be opened when this payment method is used. By default, if one of the payment methods, which require the cash drawer to be opened, is used for a part payment toward the sale, the cash drawer will open when this payment method is invoked. If this flag is set, then the cash draw will not open until the sale is completely finalised.
  • Always Print Receipt
    If this option is flagged then a receipt will be printed with every transaction. If this field is not flagged, the receipts will only be printed where it is specified for the finalisation type to the particular customer, or where the Clerk presses the Print Receipt Key.
  • Allow Split Tender to Charge
    SELLmatix allows a sale to be paid for by multiple finalisations. In other words, for a purchase of $100.00, a customer could pay $30.00 by Cheque, $30.00 by cash and charge the balance to their account with the retailer. This is known as a split tender.
    Some back office systems are unable to process split tenders, which make charges to customer accounts. If you are using such a Back Office System, then you should turn this flag off.
  • Add Products Not Found when Processing Sales
    On most Point of Sale systems, when the clerk enters an invalid PLU/SKU or scans a barcode which does not exist in the product database and error message is displayed indicating that an invalid PLU was entered, and the clerk is required to press the "Clear" key and enter the product number again. If this box is not checked, SELLmatix works in a similar manner, except that it displays the invalid number that has been entered. This can be useful if a barcode number has been entered into the database incorrectly, because you can see the number that has actually been read by the barcode scanner. There are cases where the number printed below the barcode label is different to what the barcode scanner actually reads due to printing errors on the packaging, and this can help to fix these situations.

    If this box is checked, and the operator scans a barcode which does not exist in the database, a Dialog is displayed allowing the operator to add product details "On the Fly". This is particularly useful when setting up SELLmatix and you do not have a complete product file. If the product details are entered, then in future when the barcode is scanned the description entered will be displayed and the price entered will be charged. If the operator does not wish to enter product details, they can press cancel and the Clear, and process the item as a department sale.

  • Escape all non-blank CSV fields
    SELLmatix POS exports transactions to SELLmatix Control and back office systems by way of Comma Separated Variable files. If this option is not flagged then fields that contain a comma will be placed inside double quotation marks ("), but other fields will not. If this option is flagged, then all fields which contain data will be surrounded by double quotation marks.
  • Last Receipt Issued
    This is the receipt number of the last receipt printed by SELLmatix. The next transaction number on this terminal will be one number higher than the number that appears here.
Display Settings

  • Lock Display Full Screen
    If this box is checked, then SELLmatix will display in full screen mode and only a Clerk with supervisor access will be able to access Menu Mode or perform maintenance functions. This is useful to prevent unauthorised access to the system. Before using this option, make sure that you have set up a clerk with all rights enabled.
  • Use Absolute Positioning
    This option allows you to specify absolute coordinates of the position of the Top, Left, Right and Bottom of the SELLmatix display. This option was created for systems using multiple display monitors that have very badly written display drivers. Avoid using this option unless it is absolutely necessary.
  • Hide Start Button
    If this box is checked, then the Windows Start Button will be hidden while SELLmatix POS is Processing Sales. This can be used to prevent the user from unauthorised access.
  • Hide Task Bar
    If this box is checked, then the Windows Task Bar will be hidden while SELLmatix POS is processing sales. This can be used to prevent the user from switching tasks using the task bar.
  • Hide Desktop
    If this box is checked, then the Windows Desktop will be hidden while SELLmatix POS is processing sales. This can be used to prevent the user from using icons on the desktop.
  • Disable task Switch
    If this box is checked, then keystrokes used to switch tasks such as "Alt Tab" and other keystroke combinations will be disabled while processing sales. This can be used to prevent unauthorised access to the system.
  • Disable Task Manager
    If this box is checked, the user will be unable to access Task Manager by pressing the <Ctrl><Alt><Del> keystroke combination, while SELLmatix POS is processing sales. This can be used to prevent unauthorised access to the system.
  • Center all Dialogs to the main Window
    This option is also available for the benefit of multiple display monitors with badly written video card drivers. If you have such a configuration, and Dialogs appear spanning 2 physical monitors, then you can resolve this issue by checking this option. Otherwise ignore.
  • Use Sell Menu
    If this button is checked, then SELLmatix POS will have a Sell Menu available while processing sales that works in the same way as PocketPos running on a Pocket PC. This allows items to be ordered and sold from this menu without needing buttons to be created for those items.
  • Sale Area Uses NN% of the total display
    This entry specifies the width of the sale area of the display as a percentage of the total width of the SELLmatix Display Window. The remaining area is used by Touch Buttons.
Error Warning

  • No Error Sound
    If this button is selected, no sound will be made when an operator error occurs. Use this option if you are the "boss" and you don't want anyone else to know when you make a mistake.
  • System Beep
    If this button is selected, the system will beep when the operator makes an error. This option requires no more than the basic system speaker which normally comes with every PC.
  • Sound File
    If this button is selected, then you will be able to select a normal sound file (*.wav) which is played when an operator makes an error. The .wav can be any sound recorded and set as insulting or friendly as you may wish. Some samples are installed with SELLmatix in the "Sounds" directory where SELLmatix is installed, or you can create your own sound files. This option requires that a sound card and speakers be installed on the POS machine.Play repeatedly until "Clear" is pressed.
    If this box is checked, when the operator makes an error, the error sound will be played continually until the "Clear" key is pressed. This is useful for deaf or stupid operators that may not realise they have made an error. For such operators, make this sound loud and humiliating.
Back to top

Calculation Options
Calculation Options Dialog

Overview
Most people do not realise this, but the order in which calculations are performed and where rounding occurs on the POS can change the amount of the extended line total.

When an item is sold, there are 3 steps involved in calculating the line total. These are:-

  • Multiplying the price by the quantity
  • Calculating the Discount
  • Calculating the amount of tax

In addition, the amount can be rounded if there is less than one cent involved at any stage in this process. Consider the following calculation examples for selling 3 jars of Nescafe Gold Blend Coffee where the price is $8.97 not including retail tax of 10% with no discount applicable and rounding the total to the nearest cent.

Calculation=Extend Line, Discount, Tax
3 Qty X $8.97 = $26.91
Tax @ 10% = $2.691
Line Total = $29.601
Rounded Total = $29.60
Calculation=Tax, Discount, Extend Line
Tax @ 10% = $0.897
Price Inc = $9.867
Rounded Price = $9.87
3 Qty X $9.87 = $29.61

This may not seem important, but there are a number of consequences:-

Back Office Systems
Different back office systems calculate the line totals differently. If SELLmatix calculates the line totals differently to the back office system, and you then import the transaction into the back office system for example where the sale is charged to the other account, the back office system will either refuse to import the transaction saying that it does not balance, or else, the back office system will recalculate the line total, and the amount that appears on the customer's statement will be different from their SELLmatix receipt.

The above example does cause a problem with popular Back Office Accounting packages QuickBooks and MYOB, if the SELLmatix calculation options are set to be different from the Back Office System.

Retailer Benefit
Modifying the order in which SELLmatix makes calculations and the type of rounding calculations that are made to benefit the retailer could, over the course of a year make a significant contribution to the profit of the retailer. For example a POS which processed 50 transactions per day and was able to round each transaction up by only 1 cent, this additional rounding margin would more than pay for SELLmatix software just from this feature alone. We believe that careful use of this feature can yield much better returns than this example.

The key issue however, is what is required by the back office system, and you should check and test to ensure that transactions can be imported without recalculation problems in the Back Office System.

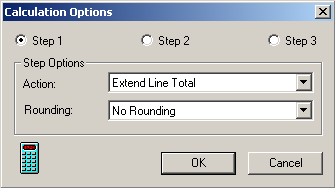
When this menu option is selected, a Dialog Box appears which allows you to change the calculation options. The fields that can be configured are as follows:-

As mentioned above, there are 3 steps that must be taken in calculating a Sale Line. When you click on the Step 1, Step 2 and Step 3 buttons, the options for that step appear in the Step Options box below. For each step you must select the Action to take and the rounding options.

  • Action
    Can be "Extend Line Total", "Calculate Discount" or "Calculate Tax". Each of these actions must occur in one of the 3 steps. What you are doing here is changing the order in which these actions are taken.
  • Rounding
    Allows you to specify "No Rounding" or various other rounding options that can occur at each step. If "No Rounding" is selected for Step 3 and there is a fraction of a cent in the final amount, SELLmatix will round the final amount to the nearest cent regardless.

Back to top


Configure Comms
Comms Parameters Dialog

Point of Sale systems communicate will devices such as Barcode Scanners, Scales, Ticket Printers and Cash Drawer in a number of different ways, and communication ports are one of the most common of these. Often these serial and parallel ports have names such as COM1 or LPT2 and so forth, however depending on the hardware involved they can be called anything.

SELLmatix can control up to 4 of these devices at the same time, and there are four Comms Channels that can be set up to match the configuration of the hardware that is connected. The configuration options for each channel are the same, and these are as follows:- NOTE: Changing these options requires that the user be logged into Windows with rights as an Administrator on that local machine. If the user has Administrator rights, a message at the bottom of this Dialog will warn that the user has Administrator Rights and that any changes will affect All Users on this computer. If the User does not have rights as a Windows Administrator on this machine, the fields will be displayed, but they will be grayed out, and a message will be shown saying that Administrator Rights are required to make changes to this screen.

  • Port Name
    This is the name of the hardware Port, and is typically something such as COM2, LPT3, or COM8. Refer to your hardware documentation or Device Manager in Control Panel for the correct name.
  • Type
    This can be Serial or Parallel. Parallel devices are generally used for output, to devices such as printers, while Serial devices are slower, but support both input and output. There are many more options that can be configured for Serial Devices, and if the device is a Parallel port, these options will be grayed out.
  • Baud
    This refers to the speed at which data moves through the port, and must match the baud rate of the device connected to the port in Port Name.
  • Parity
    This refers to one way that the devices check for data transmission errors. This setting must match the parity of the device connected to the port in Port Name.
  • Data Bits
    Refers to the word size of the data passing over the line. This setting must match the data bits of the device connected to the port in Port Name.
  • Stop Bits
    Refers to the way the devices distinguish between one character of data and the next. This setting must match the stop bits of the device connected to the port in Port Name.
  • Handshake
    Refers to the way that the devices notify each other when they are able to receive more data, or when their internal buffers are full. This setting must match that of the device connected to the port in Port Name, otherwise data can be lost or fail to be transferred. We strongly recommend using DTR/DSR or RTS/CTS instead of XON/XOFF or NONE.
  • Line
    Some devices require that signaling lines in a serial interface be asserted in addition to using the handshake lines. One common solution in this situation is to make special serial cables. SELLmatix however allows these lines to be configured in software. Experiment with this setting only if you are having trouble with communications.
  • Device
    In addition to normal comms ports the SELLmatix comms drivers are able to control ELO and Micro Touch Screens. It is normally preferable to use drivers supplied by the touch screen manufacturer, however there can be cases where those drivers have conflicts with other POS devices. In those cases, you can use the SELLmatix Touch Screen Drivers.
  • Port State
    On occasion, certain devices used by SELLmatix POS may also need to be controlled by other software that is running on the POS computer. Two common examples are where SELLmatix is integrated with an Ingenico EFT pinpad, which prints electronic fund transfer receipts on the same printer that SELLmatix uses, or where the ticket printer is also shared by promotions software.

    This is only possible on output devices such as printers, and if such device sharing is required, the port needs to be configured in SELLmatix as "Open on Demand". In that way, SELLmatix will open the device when necessary, and close it when SELLmatix is finished accessing the device, leaving it available for other software.

Back to top

Barcode Scanner
Barcode Scanner Configuration Dialog

This menu option is used to configure Serial Port Barcode Scanners. If you are using a keyboard wedge Barcode Scanner, then the options in this dialog do not apply, and you will need to configure the scanner to enter data in the same manner as it is entered from the keyboard. Refer to the scanner manual for details.

When this option is selected, a Dialog will appear allowing you to specify various Scanner options as follows:-

  • Device Type
    This should be set to Serial/Parallel, though in practice the type will be serial, USB or Keyboard Wedge.
  • Comms Channel
    This should be set to refer to the Comms Channel that has been set up for this scanner. For USB or Keyboard Wedge, set this to any channel that is not used.
  • End Transmission Character Code
    This is the character code which the scanner outputs to the end of a barcode read. Normally this character code 13 decimal, which is a carriage return character.
  • Ignore leading alpha characters
    Some scanners prefix the data scanned with alpha characters which indicate the barcode symbology used. This information is not useful to SELLmatix, and it is best to reprogram the scanner so that this information is not returned.
  • Numeric Data Only
    If flagged, tells SELLmatix to ignore alpha data and only return numeric data.
  • Leading Clerk Card Identifier Is a prefix that indicates that this data is a Clerk number instead of a Product number (PLU). This can be Alpha Characters if the barcodes on the Clerk cards use Code 39 symbology. We recommend that a numeric prefix in the range from 20-29 be used as these numbers are reserved by the European Article Numbering Association for in store use, and numbers in this range will never appear in UPC/EAN Barcodes.
  • Clerk Code Offset
    This is the number of characters from the beginning of the barcode where the Clerk Card numbers begin.
  • Clerk Code Length
    This is the length of the Clerk Code in the data scanned. This is normally 2.
  • Leading Customer Card Identifier Is a prefix that indicates that this data is a Customer number instead of a Product number (PLU). This can be Alpha Characters if the barcodes on the customer cards use Code 39 symbology. We recommend that a numeric prefix in the range from 20-29 be used as these numbers are reserved by the European Article Numbering Association for in store use, and numbers in this range will never appear in UPC/EAN Barcodes.
  • Customer Card Offset
    This is the number of characters from the beginning of the barcode where the customer account number begins.
  • Customer Code Length
    This is the length of the customer code.
  • Barcode Price Identifier
    This is the identifier that indicates that the barcode contains both a PLU number and a price. Barcodes which include a price are often printed by a Deli Scale. For example where cheese is cut to order for the customer, wrapped, weighed and labeled and then the customer takes the package to a checkout with other merchandise for payment, the barcode label printed by the scale will typically include a PLU number, and the price. The first few digits of the barcode will indicate to the POS that the barcode contains both a PLU number and a price.
  • PLU Offset
    This is the offset from the beginning of the barcode number scanned where the PLU number begins.
  • PLU Length
    This is the length of the PLU number in the barcode.
  • Price Offset
    This is the offset from the beginning of the barcode where the price digits begin.
  • Price Length
    This is the number of digits within the barcode that contain price information.
  • Price Operator
    Digits in a barcode which represent the price typically do not include any decimal point. In such cases, a price of $3.47 may be represented within the barcode as "00347". In this case, the price digits in the barcode would need to be multiplied by 100.

    Other representations may occur. This field indicates what type of mathematical operation needs to be performed on the barcode digits. The default is no mathematical operation.

  • Price Multiplier
    This field is badly named, and should have been called price "parameter". This field contains the operand used with the operator specified above. In other words, if the Price Operator was "+" indicating addition, and this field contained the value "5.23" then the value 5.23 would be added to the price contained in the barcode data.

Back to top


Scale
Scale Configuration Dialog

Overview
This menu option is used to configure an Electronic Scale if one of these is to be used with SELLmatix. Electronic Scales are often used in Grocery retail stores, which sell fresh fruit and vegetables. When the Clerk selects a product that is weighed, SELLmatix sends a command to the scale asking for the weight of the goods currently on the scale via a serial port. The scale replies with the weight.

When items are placed on the scale, it takes a short amount of time for the scale to stabilise and during this time the scale does not know the weight of the item. If the POS interrogates the scale for a weight while the scale is in transit and the weight is not known, the scale will usually respond telling the POS to retry a short time later.

When this menu option is selected, the following information can be specified:-

  • Device Type
    This should always be set to Serial/Parallel.
  • Device Channel
    The Comms Channel to which the scale is connected should be selected.
  • Weight Request Character Code
    This should be the character sent to the scale to request the weight. It can be the actual character if this is a printable character, or else a 3 digit decimal number representing the ASCII character code if the character is non-printable.
  • Ignore this character code on incoming data
    In some cases special characters are sent by the Scale to indicate the beginning of a transmission which should be ignored by the POS.
  • Scale Retry Character Code
    Is the character code which the scale sends the POS to indicate that the POS should retry the weight request because the scale has not yet stabilised.
  • End transmission character code
    Is the code the scale sends to flag the end of the weight data. Usually this is decimal 013 which is a carriage return.
  • Device Timeout (in seconds)
    This is the amount of time that the POS should wait for a response from the scale before assuming that an error has happened with the scale.
  • Numeric Data Only
    If flagged tells the POS to ignore any data that is non numeric.
Back to top

Cash Drawer
Cash Drawer Configuration

Overview
The two most common methods of controlling a Cash Drawer are through a direct connection to a Serial Port, or through a connection to the ticket printer where the POS sends a particular code sequence to the receipt printer, which in turn drives the solenoid on the cash drawer causing it to open.

If you are using a ticket printer that uses a Windows driver, SELLmatix needs to bypass the Windows print driver to directly control the printer. In this case you need to select the printer to which the cash drawer is connected. You would also need to specify what type of printer is being used because the commands to open a cash drawer attached to a receipt printer vary from model to model.

If you have the cash drawer connected to a ticket printer that uses raw control codes, the command to open the drawer would normally be a command sent to the receipt printer, and separate details for the cash drawer would not be needed. An Open Drawer command would be set up in the printer configuration.

If you are using special hardware to control the cash drawer from a serial port, then you would need to add the code to the POS configuration file manually. Refer to the Advanced documentation for ways to handle this. When this menu option is selected, a Dialog Box will appear allowing you to configure cash drawer control. The following options are available:-

Back to top


Receipt Printer
Receipt Printer Config Dialog

This menu option is used to select the receipt printer to be used in SELLmatix. When this option is selected a Dialog Box appears which allows printer options to be specified as follows:-

  • Windows Printer
    This button should be checked if you wish to use a printer that has a proper windows printer with a windows printer driver supplied by the manufacturer, and which can be configured through the Start->Settings->Printers.

    Where this option is available we strongly recommend its use as Windows printers offer significantly improved graphics and performance compared to older direct I/O printers.

    When this option is selected you can type in the name of the printer, or browse for a printer. It is possible to use a printer that is shared over the local LAN for printing in SELLmatix.

  • Direct I/O Printer
    This button would be selected if you were using a printer connected directly to a serial or parallel port. In this case one of the Comms Channels needs to be set up to handle this port, and a driver selected so the SELLmatix POS knows the control codes to be sent to the printer to perform specific functions.

Back to top


Invoice Printer
Invoice Printer Config Dialog

This option is used to select the printer used to print invoices. It is not necessary to have an Invoice Printer specified if you will only be printing receipts on the receipt printer.

Invoice printers must be Windows page printers, and can be any windows printer available over the local LAN.

Back to top