
Links on this Page
| DISPLAY CONFIGURATION |
|---|
|
Links on this Page
|
| Overview |
SELLmatix POS supports an unlimited number of display screens with buttons that can be touched
using a touch screen, or clicked using a mouse. The only limitation to the number of screens
you can use is the amount of disk space on the system and how much time you want to spend configuring the screens. This section covers configuration of the displays. Normally this would be done only once and then you would backup the configuration and restore that configuration to other machines that need to use the same configuration.
|
| Button Definition Tools |
SELLmatix Touch buttons can contain text, images and color. This makes them
easily identifiable to the POS operator. When the POS is first set up,
or product lines change, the touch buttons may need altering.
To modify/edit a button, right-click on the button with the mouse, or hold "CTRL" on the keyboard and touch the button. You will be presented with the following dialog:
 Using this dialog, you can change the background color, font size and color, and the image used on the button. The button does not require text or images, but one or the other is necessary for identification.
The "Background" Button
The "Image" Button SELLmatix POS comes with a set of "ready to use" images for buttons. These can be found in the program's installation directory under "Images". When an image is displayed on a touch button, it is stretched to fill the entire surface of the button. If you have more buttons across than down, then the image will generally appear "squished" horizontally. Any text on the button will appear over the top of the image.
"Use Image"
The "Font" Button
"Text Line 1" and "Text Line 2"
"Text 1 Vert" and "Text 2 Vert"
Extend Right
Extend Down
The "Copy Settings" and "Paste Settings" Buttons All button settings, except Text Lines and Input Events, are pasted to a button when the "Paste Settings" button is clicked. If settings have not been previously copied, then no settings will be applied.
The "Input Data" Button
|
| Changing Screens |
SELLmatix POS uses a separate file to store each screen configuration. These files conform to a naming convention of
"ScreenX.cfg" where "X" is the screen number. These files are stored in the directory where the SELLmatix POS data files are stored. The first screen that is displayed when SELLmatix POS first runs, is always Screen0. You can see which screen is currently displayed at the bottom right of the SELLmatix Display as follows:-
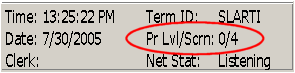 This shows that this terminal is running at Price level Zero, and the active display screen is Screen4 and thus this screen configuration is stored in the file Screen4.cfg These screen configuration files are ordinary text files which can be edited in a text editor such as Notepad. The format of these files is similar to the following:-
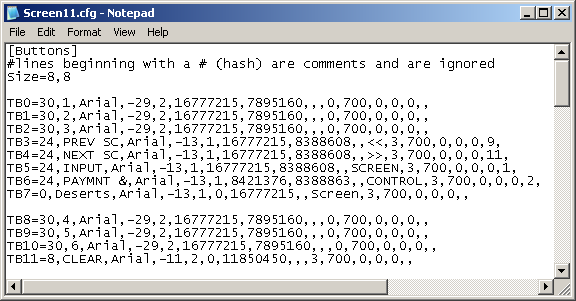 In theory, you could edit these screen files by hand, or create them from scratch. In practice however, it is normally easier to copy a similar screen to a new screen number that you wish to create, and then use the button editing features built into SELLmatix POS to make the changes you want. There are however, a couple of features which you may find useful to edit by hand. One of these is the Size=X,Y entry which specifies the number of buttons across and down on the display screen. If you wish to change the number of buttons on the screen, this is the entry to change.
After the Size=X,Y entry, are a series of lines of the form:- where "99" represents a button number, and "data" contains the configuration for that button. The "data" is written out by the inbuilt Button Editing Tool, and contains a number of fields separated by commas. Many sample screen definition files contain a comment explaining what these fields are, and you could manually edit this data. Since the Button Definition tool was developed, however nobody at himatix.com has done so, and we don't see any reason why you would wish to. Button "0" starts at the top left of the screen, and the button numbers increase across the screen until the number of buttons across is reached, and then down to the next line. Changing the number of buttons across a screen will cause the button numbers to "wrap" at a different point so that the columns in which the buttons appear will change after the first line.
Tip
Warnings If you are manually editing the screen.cfg files however, and copying sections of the file between different screens, this can be confusing, so most of the samples do have the buttons listed in numerical order.
 Terrible things will happen if you use any other encoding method, such as ANSI or "Unicode Big Endian".
|
| Configure Sale Header | ||||||||||||||||||||||||||||||||
The format of the Sale Header is controlled by entries in the [Display] Section of the configuration file, "SELLmatix POS.cfg" as follows:-
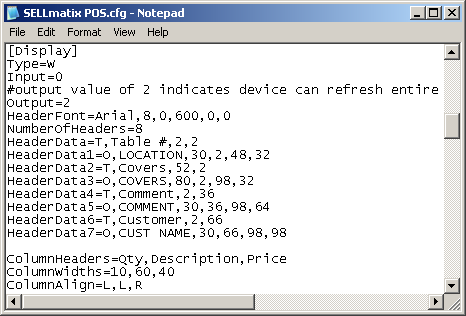 The entries in this section are as follows:- Type= Must always be set to "W". Input= Always set to "0" (zero). Output= Always set to "2". HeaderFont= Font for text displayed in header with 6 parameters separated by commas, being:-
HeaderDataN= Information about the data to be displayed with parameters as follows:- Information displayed in the header area, can be either literal "T"ext specified in this section which does not change, or "O"output variables that contain information about the sale and change according to how the sale is processed. The format of these lines is of the format:- HeaderDataN=Type,Data,X1,Y1,X2,Y2
where
HeaderData1=O,LOCATION,30,2,48,32 would display the data in the output variable "LOCATION", starting 30% of the width of this window from the left, and 2% of this height of this window down from the top. The end of the area where this variable can be displayed would be 48% of the width of this window and 32% of the height of the window. You should be careful when specifying the X and Y coordinates to avoid a situation where one line of output overwrites another. It is good practice to leave a small gap of 1-2% of the display area between the edges of the window and other fields, and to select a font which will display the data within the areas specified. This is very much a case of trial and error until you come up with something that is visually appealing and displays what you need. The table below shows valid FieldNames which can be used where the "Type" is set to "O"utput:-
| ||||||||||||||||||||||||||||||||
| Configure Sale Columns |
The columns in the sale display are configured by entries in the [Display] Section of the configuration file, "SELLmatix POS.cfg". Normally these appear below the sale header configuration lines in the display section, and an example is as follows:-
 The number of columns displayed is automatically calculated from the number of entries in the ColumnHeaders, ColumnWidths and ColumnAlign entries. If you wish to have 3 columns, for example, then you should have 3 fields in each of these entries, separated by commas. The entries in this section are as follows:- ColumnHeaders=contains the headings that appear at the top of the columns, with each column separated by a comma. ColumnWidths=contains the number representing the width of each column, with each column separated by a comma. The units used are added to calculate the total number of units, and in the example the total number of units is 120. In this example the first column is 10/120 th of the total width available. Note that the total width of the column display is reduced by the with of a vertical Scroll Bar, however, the scroll bar only appears when necessary. ColumnAlign=contains the alignment flags for each of the columns, with each column separated by a comma. Valid Values are "L"eft, "C"enter, and "R"ight. Clear Receipt=must always be set to "C". NewSale=must always be set to "C". SaleHeader=must always be set to "H".
Sale PLU= The first field must always be an "L". If no data is to be displayed in a column, such as in the "Sale Memo=" entry in the example, then this should be indicated by leaving the field name blank and inserting a comma. In this example, the first and second column for a memo would contain nothing, and the Description would contain the %DESC% field. The Field names that can be used are as follows. These fieldnames must have a leading and trailing "%" character. The FieldNames which can be used is the columns are the same as the fieldnames in the Line Dataset Variables used in other POS output. For a list of Line Dataset Variables, Click Here
Line Display Fonts & Colors Please note that the ListView Control used to display transaction lines is a built in Windows component, which clips the text to make it fit inside the space available for the line. It is very easy to specify a font size that is too big, and in this case it is clipped so that only part of the characters appear. You can specify a 36 point font if you want, but in that case you may only be able to see the dot's on the "i"'s and the crosses on the "t"'s. The Fonts used for Finalisations, Memos and Cancellations are specified by FinFont=, MemoFont= and CanFont= entries respectively. Following the = are 6 parameters separated by commas, being:-
Following the = are 3 numeric values in the range for 0 (zero) to 255. These numbers represent a RGB color reference where the first represents the Red component, the second the Green component and the third the Blue component. Most graphics programs such as PaintShop Pro, or PhotoShop also reference colors in the same way, and the same values used in these programs will yield the same results here.
For example, the entry:-
|