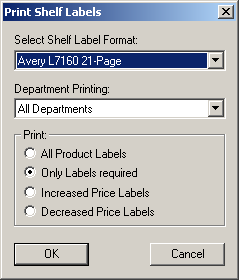
When this option is selected, a Dialog Box appears allowing you to choose
various options for printing shelf labels. The following label printing options
are available:-
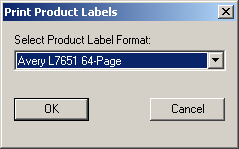
Select Label Format
SELLmatix Control supports an unlimited number of different shelf label formats.
Many retailers use smaller shelf labels for every product they stock, which
allows them to print 22 labels (or more) per page. For items that they are
promoting, they are able to use larger, more prominent labels. This option
allows selecting from the currently available range of label formats.
For information about modifying or creating label
formats, see the advanced documentation.
Department Printing
This option allows you to print labels from All Departments or to select a
particular department from which you wish to have labels printed.
Print
This option allows you to print:-
-
All Product Labels prints a label for every product in the department
selected, or for every department if "All Departments" has been selected.
-
Only Labels required prints a label for each product where the product
details have changed, including price increases and decreases, within the
selected department, or in every department if "All Departments" has been
selected.
-
Increased Price labels prints labels for each product where the price
has increased in the department selected, or in every department if "All
Departments" has been selected. In some countries there is a scanning code
of practice, which requires a retailer to give customers an item free of charge
if the price scanned at the check-out is higher than the price shown on the
shelf label. This option allows you to print labels for items where prices
have increased before activating the price increase. In this way, you can
ensure that the price on the shelf label will always be higher than the price
at the Point of Sale.
-
Decreased Price Labels prints labels for each product where the price
has decreased in the department selected, or in every department if "All
Departments" has been selected. Shelf labels for items which have decreased
in price should be attached to the shelves after the price changes
have been activated on the Point of Sale to ensure that the price scanned
is always lower that the price displayed on the shelves.
When you have made the appropriate selections, a Dialog Box will appear
reminding you to insert the correct paper in the printer.
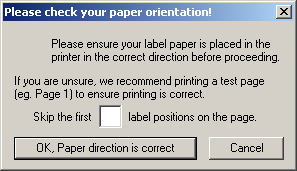
Some label stationery must be inserted into the printer correctly, otherwise there will
be print alignment problems. If you are unsure about which way the paper
should be inserted, you can print one page until you are sure that you have
the paper aligned correctly.
Skip the First XX label positions
It is unlikely that all the labels on the last page of a print job will be used because
the number of labels required will not be in even multiples of the number of labels per page.
This option allows you to start this print job using the remaining labels that were not used on
the last print job. If the first 8 labels on the page were used on the last print job, enter 8
in this field, and printing will start on the 9th label on the first page. If you want to start
printing with the first label on the page, then leave this field blank.
When printing labels for an entire store or department, it is likely that
a large number of pages will be printed, and if there is a paper jam part
way through fixing the problem may be difficult. For this reason, SELLmatix
Control prints every page as a separate document. Following this reminder,
you are able to select the printer and the desires pages you want printed.
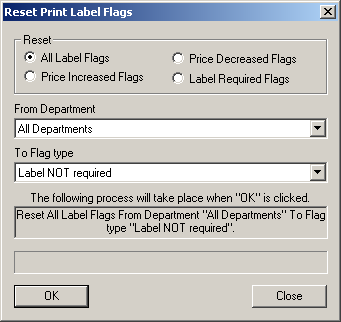
When printing is completed, you may wish to reset the label flags on products
printed, to stop reprinting.
Back to top
 In the majority of cases, the report will be generated using data stored on the computer where the report is run.
 The stock sales report shows item sales within a selectable period.