The product masterfile contains too many fields to display on the one screen, so a Tabbed Dialog is used to enter/edit
product details. You can select which page you wish to view by clicking on the appropriate Tab at the top. The first Tab shows the
Selling Details of the item. This screen is the only one which contains data that must be entered for SELLmatix to work.
The first Tab appears as follows:-
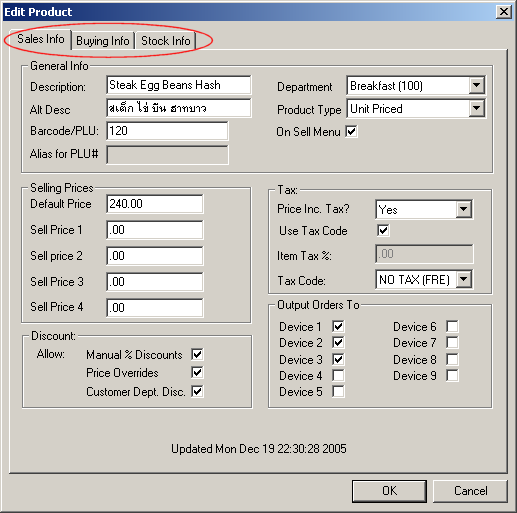
The fields available on the first Page of the Products Dialog are as follows:-
Description
The description is the text that appears in SELLmatix and on the customer
receipt. This field is normally required.
Alt Desc
The Alternate Description is designed for use in restaurants where multiple languages are used. For example, if orders
were taken in English, but the kitchen staff spoke another language such as Thai, the name of the item in Thai
could be entered in the Alternate Description, and orders on the kitchen printers could print using this Alternate Description.
The screen shot above shows an example of an alternate description in Thai. This field is not required.
Barcode/PLU
This is the barcode number of the product or the PLU (price lookup Unit)
number for the item. Sometimes this is referred to as the SKU number.
This is the main way in which SELLmatix identifies a product. This field
is typically the UPC/EAN number of the barcode, which is printed on the
product's packaging. In some cases however a different product numbering
system will be used. This field is required.
Alias for PLU#
This field is used where there might be more than one barcode for a particular item, but sales to all barcode numbers for the item
need to be tracked as if they were a single barcode.
Examples where this is useful include special promotional packaging of an item which might include a bonus such as a glass with a bottle of whiskey,
and a different barcode number is used. Or, where product comes from different manufacturing plants and carries a different barcode number.
This field can only be entered when the Product Type is an Alias.
There can be any number of alias PLU's pointing to a single master PLU.
Alias PLU's can even point to other Alias PLU's, provided that an actual product is found less than 10 levels down. If SELLmatix searches more than 10
levels of Alias PLU's before finding an actual item that can be sold, it assumes that there is a circular referencing of Alias PLU's and generates an error.
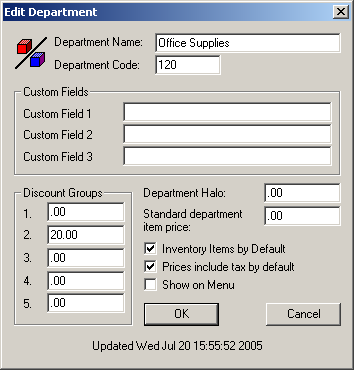
Department
Each product in SELLmatix belongs to a department. Departments are product
groupings and sales of all products in a department are available. In a
Back Office System it is often desirable to be able to report on activities
within a department. SELLmatix requires that at lease one department be set
up, and all products must belong to a department.
Product Type
This field indicates what method is used to price this product.
The default setting is for Unit Priced, which indicates that the price
is a price for each one of these products.
When Weighed pricing is specified and the item is sold, SELLmatix will assume
that the product has been placed on an Electronic Scale connected to the
POS, and it will interrogate the scale for the weight of the item. The
weight reported by the scale is treated as being the quantity purchased and
multiplied by the price.
Barcode Price indicates that the price of the item is encoded in the
Barcode that has been scanned. This is typically used with Barcode Printing
Electronic Scales, which are not connected to the POS. For example, in a
Deli Section of a Supermarket, a block of cheese may be cut to order for a
customer, weighed by the scale that prints a barcode label that is then
attached to the packaging. At the checkout, this barcode is scanned and the
price encoded in the Barcode is charged. Barcode Scanner Options in SELLmatix POS must be set up
correctly to identify such products.
Wet stock indicates that the item is a liquid, normally a petroleum product
that is dispensed through a pump controller connected to the POS. When an
item is flagged as being a Wet stock, SELLmatix interrogates the electronic
pump controller connected to the POS for the quantity and price to be
charged. This feature is typically used in Self Serve Petrol Stations.
Due to the volatile nature of petroleum products and the risks involved
should an accident occur, these environments are very highly regulated in
most countries, and are also quite different electronically. Only a limited
range of pump controllers are supported by SELLmatix, and regulatory approval
for use of other devices is usually a long process which is not justified
unless there will be a large number of sites using the devices.
Product Alias indicates that this item is to be treated as if it were another item.
When a product which is Product Alias is sold, SELLmatix looks up the Alias # that has been
specified for the product, and processes the sale as if that product had been selected. The only fields
that are used for Product Aliases, is the Product Type (to identify that it is an alias) and the Alias Number.
Output Orders To
This option is designed for situations where an item, when sold, needs to be prepared in some manner by other staff.
Any one of up to 9 different devices can be selected, and the default is that orders are not printed on anything.
This would typically be used in a restaurant or fast food outlet. Items selected from the refrigerator such as drinks would not
print on anything, however the Pizza ordered would print on a kitchen printer.
Some sites need orders to be printed on multiple printers. More than one printer can be used where this is required.
Show on Sell Menu
If this flag is set, and the department to which the product belongs also has this flag set, and Sell menus are enabled,
then this product will appear on the Sell Menu, and can be sold in this manner.
This flag is used by PocketPos for processing order on a Pocket PC is a restaurant, as is optionally available in SELLmatix POS.
Using a sell Menu is only practical where there are relatively few items that are sold in this manner. If there are more than 15 departments which
have more than 20 items in each department which appear on the Sell menu, then navigation becomes difficult.
Selling Prices
SELLmatix supports up to 5 different price levels. Different price levels may be required in one or more of the following situations:-
- Happy hour where prices are reduced at a given time of day.
- Different prices are used in different areas of an establishment. For example, in a Hotel, one price may be charged in the Public Bar,
another in the Lounge Bar, another price charged in the Restaurant and so forth. In this case you would set the price of each POS system as appropriate.
- During price changes where items went onto special promotional prices, and other came off special. In this case the new prices could be set in a different price level, and updated
on the POS, and then at the appropriate time the price level changed to the new price level.
If a POS terminal is set to use Price Level 4, but no price has been entered for an item at Price Level 4, then SELLmatix POS will use the price in Price Level 3. If this has not been set
the POS will use Price Level 2. If that is not set, it will use Price Level 1. If that has not been set, the POS will use the Default Price. If the default price has not been set, the POS will "sell" the item
at no charge.
If during a "Happy hour", only the prices of a few items are changed, then only the items where the price changes need to have other price levels entered, because SELLmatix will automatically fall back to
the next appropriate level.
Items with no price are particularly useful where common modifiers are used in food preparation. In this way, an "item" can be set up to be "No Chile" with a zero price, and this can print on kitchen printers etc.
Allow Manual % Discounts
If this box is checked, and the Clerk has permission to do so, they can manually specify a percentage discount for this item.
Allow Price Overrides
If this box is checked, and the clerk has permission to do so, then the price for this item can be manually overridden at the POS.
Allow Customer Department Discount
If this box is checked then customer department discounts can be used for this item. This box should normally be set and the discounting controlled
through the department records and customer records. You may wish to uncheck this box if the item has a particularly small profit margin which means that you can't offer the same
discount for this item as you would for other items in the same department.
Price inc. Tax
This field indicates whether the Sale Price includes any applicable retail
tax such as VAT, IVA or GST. There are 3 possible setting for this field.
These are Yes, No, or Department Default. If the Department Default is used,
then SELLmatix will use the setting in the appropriate Department to determine
whether the price includes tax. One of these three options must be set for
each product.
Under normal circumstances, you should set this option to the department default because most items
in the department will have the same setting, and if changes need to be made, with the department
default option you would need to make one change in the department record instead of changing every
product record.
Use Tax Code
If this box is checked, the tax calculations will be made according to the selected rate in the tax rate table. If this option is not set, then
the item tax % will be used.
You should normally have this box checked, and use a rate in the tax rate table, because if the tax changes, then you will only
need to make one change to the tax rate table instead of changing every product record.
Item Tax %
This is the percent amount of retail tax (VAT/IVA/GST) that applies to this
product. This field can only be entered when the Use Tax Code is
unchecked.
Tax Code
This is the Tax Code of the record in the Tax file which should be used for
calculating the tax for this product. This field can only be entered when
Use Tax Code is checked.
Product Buying Information
The second Page of the product editing screen allows you to enter Product buying Information, and appears as follows:-
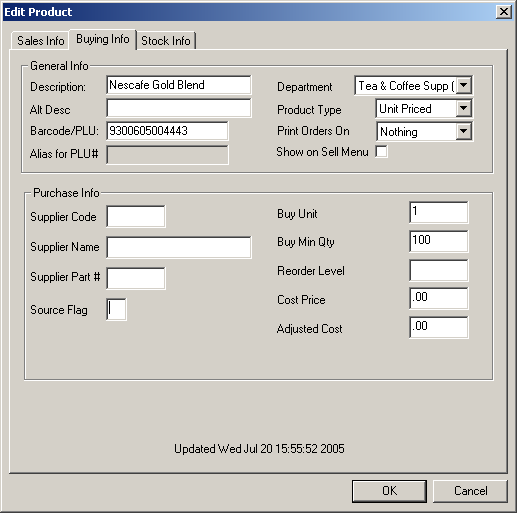 The General Information at the top of this screen applies to all edit product pages, and can
be changed on any of these screens. Refer to the description above for information on these
fields. The other Purchase Information fields are as follows:-
The General Information at the top of this screen applies to all edit product pages, and can
be changed on any of these screens. Refer to the description above for information on these
fields. The other Purchase Information fields are as follows:-
Supplier Code
This field identifies the supplier of the product. This field is not used
by SELLmatix but may be useful for importing and exporting data with a back
Office System, or useful information to be able to view or have printed on
a shelf label.
Supplier Name
This field contains the name of the supplier of the product. This field is not used
by SELLmatix but may be useful for importing and exporting data with a back
Office System, or useful information to be able to view or have printed on
a shelf label.
Supplier Part Number
This field contains the part number as used by the supplier, and is typically used when ordering product.
In many cases this is different from the part number used when selling the item. When selling the item the
barcode printed on the product packaging is normally used. But when purchasing an item, you may order a
carton containing 24 or some other number of these items, and the carton would generally have a different code.
This field is not used by SELLmatix but may be useful for importing and
exporting data with a back Office System, or useful information to be
able to view.
Source Flag
This flag is not normally used, but can be used where most of the merchandise is supplied by a single warehouse which maintains
product masterfiles and pricing, but where some of the items come from other suppliers. An example where this may be of use is with
independent grocery stores.
Buy Unit
This field contains the number of units in which the item is bought. For example, if the product comes in boxes containing 8 items,
then the Buy Unit would be 8.
Buy Min Qty
If the supplier required that the minimum purchase quantity for the item was 3 boxes, and each box contained 8 items, then this field should be
set to 24.
Reorder Level
This field contains quantity on hand at which a Reorder should be made. This is not used by SELLmatix, but could be useful when using a spreadsheet
to generate reorder lists.
Cost Price
This is the cost price which is paid to the supplier when items are bought. This is not used by SELLmatix, but may be useful with a back office system
or for analysis purposes.
Adjusted Cost
This is the adjusted cost price of the goods including other components such as freight etc. As such it represents the actual landed cost of the merchandise, as
opposed to the price paid to the supplier.
This field can be useful if using exported transactions to calculate gross profit reports in a spreadsheet.
Product Stock Information
The third Page of the product editing screen allows you to enter Stock Information, and appears as follows:-
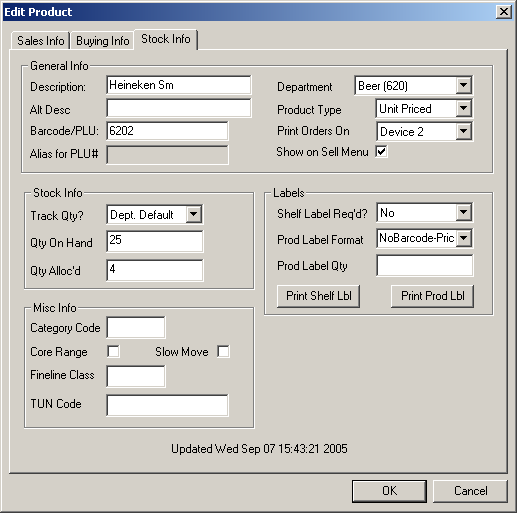 The General Information at the top of this screen applies to all edit product pages, and can
be changed on any of these screens. Refer to the description above for information on these
fields. The other Stock Information fields are as follows:-
The General Information at the top of this screen applies to all edit product pages, and can
be changed on any of these screens. Refer to the description above for information on these
fields. The other Stock Information fields are as follows:-
Track Qty?
This field should normally be set to "Dept Default", because most items within a department will operate in the same way, and when changes are required you will be able to make
one change in the Department Record instead of changing every product record.
If this flag is set to Yes, or the setting for the department is yes, then SELLmatix will deduct sales of the item from the Quantity on hand.
For items which are made (meals in restaurant for example) this flag should not be set, because large negative quantities will build up in the Qty On Hand field.
If you are using another back office system to process inventory, then this flag should not be set, as SELLmatix will not be used to record stock deliveries in that case and large negative
quantities would accumulate.
Qty on Hand
This shows the quantity of these items which are in stock. If SELLmatix Control is tracking the Quantity for this item, this
quantity is reduced when sales are paid for.
This Qty on Hand, is not necessarily the quantity available to be sold, because this quantity is not reduced when an item
is ordered, but when the item is paid for. For example, if there was stock of 24 items, and 10 of these had been supplied to tables in
a restaurant, but not yet paid for, the Qty on Hand would still be 24, and the Qty Alloc'd would be 10 leaving an available stock of 14.
Qty Alloc'd
This shows the quantity of items allocated but not yet paid for (finalised). In a restaurant environment, when an item is ordered,
and supplied to the customer, it is added to the quantity allocated. Later, when the sale is paid for
the Qty Alloc'd is reduced along with the Quantity on Hand.
Category Code
This field is not used by SELLmatix and is not normally useful. In some cases however this information is supplied along with masterfile data from major suppliers, and this information needs to be preserved for possible future use.
Where this is not the case, this field could safely be used to record any other information.
Core Range
This field is sometimes used to indicate that an item is a key product that must be carried. In some cases, detailed analysis might be done to reduce the range of items stocked eliminating low profit items. In a supermarket, however, bread would be considered a "Core Range" item which could not be eliminated no matter how low the margin.
This field is not used by SELLmatix and is not normally useful. In some cases however this information is supplied along with masterfile data from major suppliers, and this information needs to be preserved for possible future use.
Where this is not the case, this field could safely be used to record any other information.
Slow Move
This field is sometimes used to flag items which sell slowly and have a longer restocking cycle than most items. For example, most items may be able to have the stock replenished in 7 days, but some items require 30 days to have orders filled.
Fineline Class
This field is not used by SELLmatix and is not normally useful. In some cases however this information is supplied along with masterfile data from major suppliers, and this information needs to be preserved for possible future use.
Where this is not the case, this field could safely be used to record any other information.
TUN Code
The Trade Unit Number Code is not used by SELLmatix and is not normally useful. In some cases however this information is supplied along with masterfile data from major suppliers, and this information needs to be preserved for possible future use.
Where this is not the case, this field could safely be used to record any other information.
Shelf Label Required
This flag indicates whether a shelf label showing the price is required.
Few retail stores running SELLmatix will have individual price labels attached
to a product, but will instead have a barcode printed on the item's packaging
and one price and description label attached to the shelf where the item is
on display. When prices change, it is only necessary to change this one
label instead of re-labeling each item.
In many countries, there is a "Scanning Code of Practice", and sometimes
a legal requirement, relating to instances where the price scanned at the
POS is different to the price on the shelf label. When the price charged
is lower than what is on the shelf label, there is no problem, because
the customer benefits. If the price scanned is higher, however, often the
customer is entitled to the item at no charge.
Often price updates include both price increases and price decreases.
To handle this situation, SELLmatix flags whether a price has increased or
decreased. When prices are updated, it is recommended that the retailer
print new shelf labels for price-increased good and apply these shelf
labels before updating the prices on the POS. After updating prices on
the POS, shelf labels for items which have had price decreases, should
be printed and applied in the store. In this way customer problems are
eliminated.
Prod Label Format
In cases where you do need to print product labels which are attached to each item,
you can use different label types. This option allows you to specify the type of product
label to be used for this item. This option applies only where you use a special
label printer which allows printing of labels as the details are edited. If labels
are to be printed later in a batch on a page printer, then the label format is selected
at the time the batch job is printed.
Prod Label Qty
This is the number of product labels to be printed, which may be different from
the quantity on hand. If the "Print Prod Label" button is clicked and a special Label
printer is installed, the number of labels in this box will be printed, and this
field will be cleared. If this button is not clicked, then this quantity is saved,
and the labels can be printed later in a batch.
Print Shelf Label
Clicking this button will print a single shelf label if a special label printer is installed.
Print Prod Label
Clicking this button will print product labels if a special label printer is installed.
Back to top