SELLmatix Troubleshooting Guide
Links on this Page
Introduction. Read This First!

Computer System
Network
Printers
Barcode Scanners
Serial Devices

Summary


Introduction... Read This First!
When problems occur on POS systems, often the most difficult thing is to determine the cause. If kitchen orders are not being printed on the kitchen printers, the fault could lie with the software configuration, the network configuration, the cabling, printer sharing or with the actual printer. In this case, checking the software configuration will not help if the printer has run out of paper.

In many cases, when the cause of the problem is identified, a solution is obvious. In other cases, identifying the cause of the problem will also identify who needs to resolve the problem. The reason why some people think it is a good idea to buy everything from one vendor, is to avoid a "blame game" where a hardware supplier blames the software and software supplier blames the hardware. This can be a problem if the hardware service people don't know how the software works, and the software people are not familiar with the particular hardware.

This troubleshooting guide cannot hope to discuss solving problems with every possible piece of equipment that can be used with SELLmatix. What it can do is:-

  • identify whether a problem is a hardware issue or a software issue.
  • provide a checklist so that you can verify if hardware has been installed correctly.
  • provide a method by which hardware devices can be tested and the installation checked that is independent of, and does not require knowledge of SELLmatix software.
Being able to identify whether a problem lies with the hardware or the software is particularly important with products such as SELLmatix where hardware and software support is often handled by different suppliers.

Whenever new hardware is installed, you perform the tests and check is this troubleshooting guide to verify that the equipment works correctly before trying to configure SELLmatix to use those devices.

Whenever a problem develops, you should follow the steps in this troubleshooting guide to determine who to contact for assistance.

Another important reason for following the steps in this guide is so that you can explain the problem clearly and accurately. If you call you hardware support people and say that "Orders from terminal 3 are not printing in the kitchen", they will probably have no idea how to help. But if you follow the steps in this guide and tell them that "I can't 'ping' terminal 3", they will have a very clear idea of what the problem may be, as well as how to fix it.

Back to top


Computer
In order for software to run reliably, the computer must be reliable and stable. This is true for any system, but it is particularly true for Point of Sale systems because they typically connect to more devices such as receipt printers, Pole Displays, Barcode Scanners etc.

If these devices are not installed correctly they will conflict with other devices and cause unpredictable behavior.

Whenever new equipment is installed, or you have a problem which you cannot immediately identify, you should check for conflicts in Device Manager. There are a number of ways to access Device Manager which vary according to your Windows configuration, but you can always access it through:-

Start->Settings->Control Panel->System->Hardware->Device Manager

The device manager display is something like the following.

Device Manager Errors

Notice that in this case, Device Manager indicates that there is an error with the Network Adaptor, (the red "x"), and that there is something unusual with the PCI Multimedia Device (The yellow "!").

This indicates that these devices are not installed and working correctly.

There are occasions where these warnings do not seem to affect the system's operation, because you are not using anything that conflicts or uses these devices. If you were using those features, then you would experience problems.

There are some computer technicians that will look at some conflicts and try to claim that they don't matter in your case. They are lying. You should never have any conflicts shown in device manager.

Problems in device manager can be resolved in a number of ways which depend on the particular devices. This may involve installing new drivers, changing configuration settings or removing the device entirely. For computer technicians this is fairly routine work, and when they are finished, check for conflicts yourself, and don't sign off on the job until all conflicts have been resolved, and no warnings or errors are displayed.

Another useful tool in checking the performance of the system is Event Viewer. This can be opened through:-

Start->Settings->Control Panel->Administrative Tools->Event Viewer

The Event Viewer display shows abnormal events which have occurred in the system and appears something like the following:-

Event viewer

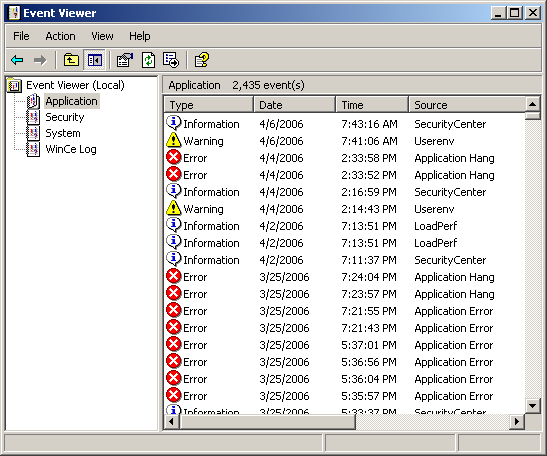
Unlike Device Manager, there will always be something that appears in Event Viewer because the "events" being reported on are retained until the log is cleared. Note the date and time where the various events occurred.

Double clicking on an event shows additional information. Much of this information is too cryptic to be readily understood, however in many cases the information shown indicates which program or process has generated the "event" and combined with the date and time, this information can be useful in identifying a problem.

If a system is malfunctioning, examining the log in event viewer will often give an indication as to the cause. For example if SELLmatix Control is not connecting to the POS terminals, and the event logs reveals repeated "events" relating to the network adaptor or network drivers, this is a very good indication that there is a networking problem.

Most POS terminals do not connect to the internet, and hence the risk of a virus is fairly low. Even so, it is a good idea to periodically check for viruses or spyware. These can interfere with the operation of the system. It is rarely necessary to run anti-virus software on POS terminals all the time. Anti-virus software which checks each read and write to the disk can significantly slow POS operations particularly where a slow machine is used as a POS terminal.

If any conflicts are shown in device manager, or events are shown in Event Viewer which indicate a problem with the computer, these issues need to be resolved by a computer technician before looking for software issues.

Back to top


Network Troubleshooting
There is an almost infinite number of different ways in which your network can be configured, and it is impossible to cover all the possibilities in this troubleshooting guide. And it does not matter how the network is configured for SELLmatix to run, as long as the network is running.

There is a very simple method to check and test to see if your network is configured correctly. This involves "pinging" each of the POS machines from the machine running Control.

The "ping" command sends a small packet of diagnostic data to another computer over the network. When the other machine receives a diagnostic "ping" packet of data it replies. If the originating machine receives the reply, then the network is working correctly.

You run the "ping" command from the Command Prompt window by typing:-

ping <computername>
and pressing the <Enter> key.

<Computername> can be the name of the computer which can be resolved to an IP address, or it can be an actual IP address. You can ping internet servers as well if you are connected to the internet. The output of the "ping" command is similar to the following:-

Pinging Network Terminals

In this example, the ping command was run once for the computer named "localhost" and once for a computer whose IP address is 192.168.0.182

The name "localhost" is a reserved name that always refers to the machine which you are working on. Running "ping" on localhost verifies that the networking is installed and running properly on that machine. In this case, the response was very fast, less than 1 millisecond, there 0% loss of data.

The second ping command failed. Each attempt timed out and there was 100% loss of data. This indicates a problem and that the other machine is not connected via the network.

If the ping command is successful with 0% data loss, then the network is OK. If there is any data loss, this needs to be fixed by a network technician before using SELLmatix.

Note that if a terminal connection is broken, and then the connection is restored, SELLmatix will automatically reconnect. The broken connection could be because a cable is unplugged, or a wireless terminal moves out of range. In such cases the "ping" command will fail, but once the cable is plugged back in or the terminal moves back into range, the connection is automatically restored.

If the computer running SELLmatix Control is unable to "ping" each of the POS terminals, this needs to be resolved by a network technician before looking at software configuration.

Back to top


Printers
If you have any printer issues, the first thing to do is to print a Windows Test Page.

Countless hours have been lost by people who have tried change software settings for a printer, when the real problem was that a test page would not print correctly.

If the Windows test page will not print correctly, the software will not work. Correct the problem with the drivers or hardware so that the test page will print correctly, and there is a 99% chance that the software will work correctly.

If the printer is a receipt printer which uses rolls of paper and has a paper cutter, then the drivers need to be set up so that it cuts the paper at the end of the print job. If the cutter is configured correctly, then the printer will cut the paper at the end of the Windows test page.

If you paper cutter is not working, then do not look in the software to resolve this issue. Change the driver setting so that the paper is cut at the end of the Windows Test Page.

Receipt printers should almost always be set up as network printers which are shared and can be used by any of the POS terminals.

In such cases, you need to print a Windows Test Page from each and every computer that will use that printer. The fact that you can use the printer correctly and print a test page from one machine, does not mean that you can use that printer from any other computer. You need to test this by printing a Windows Test Page from every computer that will use that printer.

Sometimes people complain that paper cutters only work some of the time. In fact what is normally the case is that the drivers on one or more of the computers are not set up to cut the paper at the end of the print job. When those computers use the printer, the paper does not cut. When other computers which have the driver correctly installed use the printer, the paper does cut.

Paper cutting on windows printers is controlled by the driver at the end of the print job.

If Windows Test pages cannot be printed correctly from every POS terminal that will use the printer(s), as well as the machine running SELLmatix Control, this needs to be resolved before looking at software configuration.

Back to top


Barcode Scanners
This section applies to barcode scanners which use a "Keyboard Wedge" or USB connection to the computer. To test scanners which use a serial interface refer to the Serial Device section below.

Keyboard wedge scanners are inserted into the connecting cable between the keyboard and the computer. Normally the scanner has a "Y" cable, where the keyboard plugs into one part of the "Y" and the other plugs into the computer.

Note that keyboard connectors should not be "hot plugged" while the computer is turned on because this can cause physical damage to the computer, keyboard and scanner. Often no damage occurs if the system running, but you are gambling if you try. Power down the computer before changing keyboard connectors, and make sure that you don't plug keyboards and mice into the wrong connector on the computer.

USB, Serial and Parallel connectors can be hot plugged, and do not require that the system be shut down.

Keyboard Wedge and USB Barcode Scanners emulate the keyboard so that the data entered is as if it had been typed by the operator.

To test if a USE or keyboard Wedge scanner is working correctly, run a program such as Notepad, WordPad or whatever. Make sure this program is the Active window. In other words the title bar is highlighted, and that when you type information on the keyboard it appears in the window.

Scan some barcodes with the barcode scanner, and the data should appear in the window as if you had typed it in, something like this:-

Scanning Barcodes into Notepad

The actual data that appears will depend on the barcodes you scan.

The scanner should be configured so that it adds a Carriage Return/Line Feed combination at the end of each read. In other words, at the end of each scan, the cursor drops to the beginning of the following line as you see above.

If what you see when performing this test is similar to what appears above, then everything is probably OK.

There are however different Barcode "Symbologies". These are like languages. Most barcode readers can handle most symbologies automatically. In other cases, the barcode scanner may not be set up to read some of the symbologies which you need. In these cases, you can usually configure the scanner to read they type of barcode symbology you need it to handle, and often this is done by scanning a series of barcodes in the manual that comes with the scanner.

If you are having trouble reading certain barcodes, then test to see if the scanner can read the barcode as described above using Notepad. When the scanner is configured correctly, it will be read and appear in Notepad the same as other barcodes.

Occasionally scanners are programmed to provide a prefix or postfix. This is data that appears before the scanned data or after the scanned data. This is rare, and if possible, it is better to not use prefixes or postfixes, excerpt for the Carriage Return/Line Feed at the end of the scan.

Some barcodes (typically UPC/EAN barcodes) which appear on product packaging also have a human readable number printed below which is the same as the number encoded in the barcode. In some rare cases, the human readable number is misprinted, and the number scanned by the barcode reader is different to the human readable number. If this is the case, assume that the human readable printed number is wrong and that the barcode scanner is correct. In other words, ignore this.

If a Keyboard Wedge or USB barcode reader does not show the data read in notepad as described above, this issue needs to be resolved before looking at software issues.

Back to top


Serial Devices
Device connections using Serial Ports are some of the most flexible and reliable connections and serial communications have been used for longer than any other type of connection. Configuring these connections however is not automatic and can be fairly frustrating.

This section is designed to help you test if the connection to a serial device is set up correctly. Testing if the device is working properly is fairly simple. If you need information on configuring serial devices, please refer to Serial Interfacing.

Devices which use serial interfaces typically include barcode scanners, Pole Displays, printers, scales etc.

To test a serial device you need a serial terminal program or teletype program. Many of these are available and there is a good chance you already have one on your system. The one we use is called MTTTY.EXE which stands for Multi Threaded TTY (yes, 3 "T"'s). This program is a Microsoft Code sample for software developers that illustrates certain programming techniques, but it is also very useful for testing connections to serial devices. This as well as other TTY programs are available for download over the web by doing a search on your favorite search engine. The MTTTY display appears as follows:-

MTTTY Display

Once again, this document covers testing to see if a device is functioning correctly. Not how to configure the device.

There are a number of serial port parameters that need to be entered to test the interface. These are entered into SELLmatix when configuring the device, and you need to use the same entries in SELLmatix as are tested here. These settings are:-

  • Port Name
    This is the name of the hardware Port, and is typically something such as COM2, LPT3, or COM8. Refer to your hardware documentation or Device Manager in Control Panel for the correct name.
  • Baud Rate
    This refers to the speed at which data moves through the port, and must be the set to the same value on the computer and the device.
  • Parity
    This refers to one way that the devices check for data transmission errors. This setting must match the parity of the device connected to the port.
  • Data Bits
    Refers to the word size of the data passing over the line. This setting must match the data bits of the device connected to the port.
  • Stop Bits
    Refers to the way the devices distinguish between one character of data and the next. This setting must match the stop bits of the device connected to the port.
  • Handshake
    Refers to the way that the devices notify each other when they are able to receive more data, or when their internal buffers are full. This setting must match that of the device connected to the port, otherwise data can be lost or fail to be transferred. We strongly recommend using DTR/DSR or RTS/CTS instead of XON/XOFF or NONE.
Once these values have been entered, you should connect to the device. The TTY program will have an option to do this.

Once connected, the way that you test the device depends on whether the device sends data to the computer, or receives data from the computer.

For example, a Pole Display receives data from the computer and displays it. Typing information into the TTY program should make it appear on then Pole Display.

Printers also receive data from the computer, so entering data in the TTY program should result in it being printed on the printer. Printers however often "buffer" information, which means that it is not printed immediately. TO make the data print a series of <CTRL><Enter> keystrokes will often cause the data to print and a line fed from the printer. Do a number of these keystroke sequences so that the paper feeds out of the device.

Devices such as Barcode Scanners send data to the computer. With those devices you should scan some entries and the data should appear the3 same was as it does when using Notepad to test USB and Keyboard Wedge scanners.

If data is received, but it appears scrambled or rubbish data, that indicates that the communications parameters are incorrect.

Please note that this type of test shows that that data is passing between the device and the computer. It does not test if the data appears in the format that you want.

If no data is passed between the computer and the serial device, or the data is scrambled, then this needs to be resolved before looking at software issues.

Back to top


Summary
The tests described in this section are used to determine whether a problem is caused by hardware and device configuration errors, or whether the problem is caused by software issues.

If any of these tests fail, they should be fixed by a computer technician, and they can do this without needing to understand the POS Software. In most cases, when a system passes these tests, the job of the computer technician is finished.

If all of these tests pass, then the problem is almost certainly a software configuration issue.

One final point. All these test should be performed on the complete system. If a printer is installed and tested OK, and then another device is added, the printer needs to be tested again, because changes/additions of devices can "break" the configuration of other devices.

When changes are made to devices, test everything again.

When problems develop on a system that has been running properly, perform the tests again so that you know what has gone wrong, as well as who needs to fix it.

Back to top