HARDWARE SETUP
`
Stuck? Question?
Name
Reply to Email
Enter Your Question Here
Links on this Page

System Requirements
Computer Configuration
Network Configuration
Printer Configuration
Barcode Scanner Configuration

Cables and Environment


System Requirements
The minimum system requirements to run SELLmatix are:-

Pentium III processor / 800Mhz
128Mb RAM
4Gb Hard Disk or Network storage space
Ethernet Network Adaptor
Windows 2000 or later

On Point of Sale terminals it is recommended that the following devices be available

Cash Drawer
Receipt Printer
Barcode Scanner
Page Printer (if invoices are required)

Devices connected to the Point of Sale can use Serial (RS-232), Parallel or USB connections. Printers and Cash Drawers driven by Receipt Printers can be either local devices or devices which can be accessed over the local LAN. More than one POS system can share receipt printers or Cash Drawers without problem.

Back to top


Computer Configuration
Before installing SELLmatix, you need to ensure that the computer is in good working order and stable. The latest Service Packs and critical updates should be installed, and there should be no obvious reliability problems with the computer.

Run a virus scan and remove any Spyware that may interfere with reliable operation of the system.

SELLmatix exercises devices which are often not used on many computers, and you need to ensure that there are no device conflicts shown in Device Manager. Even if you think that a device which shows a conflict will not be used, conflicts can and do affect other devices. Make sure to resolve and Warnings or Errors displayed in Device Manager before proceeding as these are likely to produce strange problems in unpredictable ways.

Checklist

  1. Latest Service Packs and Critical Updates Installed
  2. Virus Scan and remove Spyware
  3. No Errors or Conflicts in Device Manager
Back to top

Network Configuration
SELLmatix requires that a Network Adaptor is installed in the computer, and that standard Windows TCP/IP networking be configured correctly, even if the computer is running standalone.

The range of network configurations that can be used is almost infinite. The underlying network architecture is unimportant and existing installations run over wired LANs, Wireless connections and even over dial up internet connections. Standalone machines still use TCP/IP networking, through "localhost" or the local loopback address 127.0.0.1

Static IP addresses can be used, any standard form of name resolution such as DNS or WINS or any combination of these.

What matters is that each of the machines are able to PING the others. Before installing SELLmatix you should test to verify that each of the machines can Ping the others.

When installing, it is useful to have shared directories that allow files to be copied from one machine to another by clicking on "My Network Places". This however is not necessary for running SELLmatix and during installation, you can use a Sneakernet to move files from one machine to another if you prefer.

SELLmatix POS acts as a network server, and must "listen" on a port to accept incoming connections from SELLmatix Control. The default port on which SELLmatix POS listens for incoming connections is Port 20000. This port is rarely used by other software so conflicts are unlikely. If you are using a firewall, then the firewall may need to be configured to allow SELLmatix POS to accept incoming connections from SELLmatix Control.

Checklist

  1. Take note of either the IP Addresses or computer names that are used and if using names that the names can be resolved correctly.
  2. Check that each POS terminal can Ping the Control machine, and that the control machine can Ping each of the POS terminals.
  3. Check that shared directories can be accessed to copy files over the network while performing the installation.
Back to top

Printer Configuration
SELLmatix supports printers that have Windows drivers, and printers which are controlled through direct I/O to a serial or a parallel port. Wherever possible, you should use Windows drivers instead of direct I/O, because with Windows drivers the printer can be shared and used by other POS terminals, and Windows drivers make printing graphic logos easier where the device makes this possible.

Printers with Windows Drivers
The quality of Windows printer drivers varies widely, and for many printers there are a number of driver versions. In general, you should try to make sure that you are using the latest version of the Windows driver, as later versions correct bugs in earlier versions along with providing enhancements.

The important thing for SELLmatix is that you can print a Windows Test Page. Don't be too worried if the graphics don't look great, because POS printers are designed to be heavy duty and reliable with low cost consumables, not to print the most fancy graphics with high consumable costs.

If the printer has a paper cutter, the driver needs to be configured so that it automatically cuts the paper at the end of the page. If the printer cuts the paper at the end of the Windows Test Page, this feature is set up correctly.

Paper cutting must be set up in the driver configuration since with Windows Drivers all output sent by programs such as SELLmatix is treated as printable and control codes to operated the cutter cannot by sent by the software as part of a normal print job.

Windows Printers need to be shared if they are to be accessed by other computers on the network, and you need to ensure that you can print a Windows Test Page from each of the other computers.

Direct I/O Printers
For raw printers which connect via Serial or Parallel Ports and which do not have a windows printer driver available, they should be set up so that a directory listing can be printed from a command prompt as follows:-

C:\>dir > lpt1

or

C:\>dir > COM3

Checklist

  1. Check that Windows Test pages can be printed for each printer with a Widows Driver.
  2. Check that the printers with Windows Drivers are all shared with the right permissions.
  3. Install drivers for printers with Windows Drivers on each machine that will need to access the printer, and verify that these computers can print Windows Test Pages on these printers.
  4. For direct I/O printers without Windows drivers, check that you can output a directory listing to that device using command line redirection as in the example above.
Back to top

Barcode Scanner Configuration
There are many different type of Barcode Scanners which range widely in cost, performance and features.

All of these scanners provide some way of configuring the scanner, and usually this involves scanning a sequence of barcodes that are printed in the manual supplied with the Scanner.

SELLmatix Point of Sale will work with most scanners straight out of the box, without any special configuration. We recommend that you use the default configuration if possible, but with some scanners it may be necessary to perform some configuration.

The manner in which scanners connect to the computer will be one of three main types.

  • USB Scanners plug into a USB port on the computer, and draw their power from the powered USB port. Some USB Scanners come with drivers that must be installed, while others install themselves automatically.

    In either case, they are configured as USB "Human Interface Devices", which means that when you scan a barcode, the data scanned is input as if you had typed that data on the keyboard. These devices are tested the same way as Keyboard Wedge barcode scanners.

  • Keyboard Wedge Scanners are "inserted" into the cable between the keyboard and the computer. The Scanner contains 2 plugs. The keyboard plugs into one of these instead of the computer. The other connector plugs into the computer where the keyboard would normally connect.

    No drivers are required for Keyboard Wedge scanners, and the computer does not even know they are installed. Data scanned appears to the computer as if it had been typed on the keyboard. Power to drive Keyboard is taken from the power supply to the keyboard through the keyboard cable.

    These devices are normally not suitable for Touch Screen systems that do not use a keyboard.

  • Serial Scanners connect to a Serial (RS232) port on the computer. No power supply is provided on RS232 ports, so Serial scanners normally have a separate plug pack and connector to provide power.
Testing USB and Keyboard Wedge Scanners
Since USB and Keyboard Wedge Scanners simulate a keyboard, you can test that these devices are installed and working correctly by opening Notepad and scanning some barcodes. The following is an example of what will appear for a correctly installed and configured Scanner.

Scanning into Notepad

The actual data shown will depend on the barcode data being scanned. Note however that the barcode numbers being scanned have each barcode number on a separate line, and that the lines are not double spaced.

Testing Serial Scanners
Serial Scanners can be tested using an RS-232 Terminal Emulation program. There are many of these available, and the one we most often use is MTTTY.exe.

These terminal programs require that the correct baud rate, data bits, stop bits and parity be set up. You will need to know these parameters so that they can be entered into SELLmatix POS.

Once these figures have been set up correctly, similar results should display in the terminal window to what appears in the Notepad window above for USE and keyboard wedge scanners.

Checklist

  1. For USB and Keyboard Wedge scanners verify that scanned data appears in Notepad as above.
  2. For Serial Scanners, verify that scanned data appears in the terminal program window as in the Notepad example above, and that the communications parameters are recorded so they can be entered into SELLmatix POS
Back to top

Cables and Environment
Much of what one hears about operating environment requirements for computer systems and equipment can most diplomatically be referred to as "plain rubbish".

On one hand there are those who claim that computer equipment needs to be run in virtually "clean room" conditions, with no smoking, filtered air and completely dust free. Yeah right...

And on the other hand, there are those who claim to be trained and experienced that really don't have a clue.

Reality is that Retail Point of Sale environments, particularly where food and drink preparation is involved are far more hostile to electronic equipment than an office. Spillage occurs, and often kitchen printers are required to run in high temperature, high humidity and with high throughput. Specially designed POS equipment such as ticket printers are designed to be rugged, heavy duty, high volume and with low consumable costs. But they are more expensive than low volume printers designed for home use.

Often there is no way to avoid rugged working conditions, and while you might do your best, at the end of the day the equipment just has to cope with the rugged working conditions.

There are however, some issues which do matter and require careful consideration. Cabling is one such issue.

In a POS installation, there will often be long cable runs between devices such as POS controllers and Kitchen/Bar printers, and significant cable runs between computers so that they are networked together. Due to the presence of electrical cookers, refrigeration units, sound equipment etc., careful attention must be paid to the cabling to ensure that interference does not result.

Data cables are low voltage, and provide a signal to the device at the other end, carrying only sufficient power to make the signal readable. Data cables do not provide power to the other device, only signal.

Transformers have two or more lengths of wire in close proximity with no electrical connection between the circuits. The current in the primary windings induces a current in the secondary side of the transformer from the magnetic field. While the wire lengths in a transformer are relatively long, they are wrapped together so that they consume little space.

Running a data cable right next to a mains power cable for 30 meters, however, has exactly the same effect as a transformer. The mains power cable will induce a current in the data cable, resulting in interference and even physical damage to the devices at either end.

When running data cables, the following rules need to be observed if reliable performance is desired:-

  1. The correct type of cable must be used. Cat 5 Unshielded Twisted Pair used for network adaptors is not suitable for Serial RS-232 cables. Shielded RS-232 cable is not suitable for ethernet LAN cable.
  2. Data cables should be located as far as possible from mains voltage cables with a minimum separation of 1 Meter for any parallel run, and preferably more. Where physical constraints make it necessary for data cable to cross power cable, it should do so at as close to a 90 degree angle as possible.
  3. Data cables should avoid close proximity to RF cables.
  4. Data Cables should be routed around devices which draw high loads or create magnetic fields such as refrigeration units, loudspeakers, fluorescent lights etc.
Caution
There are many people, including electricians, with experience installing power cables who think that data cable can be handled the same as the other cables with which they are familiar. The following photos were taken of a site where a network cable had been installed by such an "expert", where strange behaviour was being observed.

In this particular case, the network would work correctly about 50% of the time (seriously!). The rest of the time, the devices would disconnect every 10-15 seconds and reconnect. Other intermittent behaviour was observed which was consistent with interference occurring when other devices in the area were switched on an off.

Most of the cable was run in a suspended ceiling. The only externally visible part of the cable run appears below where the cable was routed around a structural part of the building.

Exposed Cable

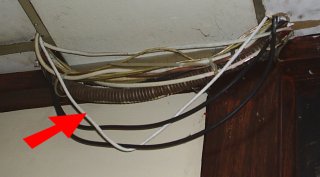
If this "professional" exposes this quality of workmanship to the naked eye, then one might wonder what the hidden work was like. To the right of the exposed photo, the network cable was run as follows:-

Cable Inside Right

That transformer might be for low voltage lighting, but the primary windings still carry mains voltage, and here the low voltage data cable is physically touching the transformer right in the middle of the magnetic field. 
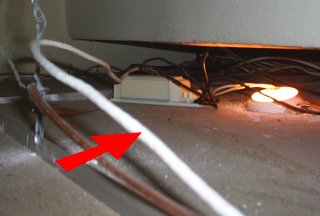
To the left of the exposed cable, things start to degenerate somewhat.

Cable Inside Left

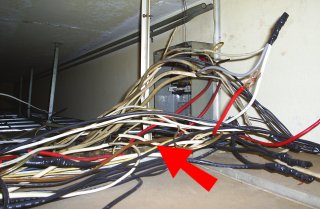
Here is a concoction of mains voltage cables, RF closed circuit camera and radio transmitter cables to an aerial on the roof. And 3 Phase power cables. No Virginia, 3 Phase is not OK. 3 Phase is mains power on steroids.

We believe that some of these cables were no longer used, and did not carry current. If they did, then the network would not have worked at all, and it is highly likely that physical damage to the network hardware at both ends would have occurred.

This is not to say that "electricians" don't know how to run data cables. Those that know how to run data cables and have experience, are normally very good. Problems occur when people think they know what they are doing, but in reality don't. This job was done by such a person, who had been told the above points about running data cables, but who thought he knew better...

This sort of work does not save time and money compared to a professional job. It costs far more than a professional job done right in the beginning, because it all has to be undone and then done properly.

If you haven't already done so, why not activate SELLmatix now and start enjoying the benefits of the system now. With SELLmatix, you don't have to pay for everything up front. You can implement the system in stages adding parts as you go from the savings you make. As little as $30 gets you started. No risk. No long term commitment. Activate Now!

Back to top