CONFIGURATION FILE
Links on this Page
Overview
Warnings
The [System] Section
Input Filters


Overview
Most configuration information for SELLmatix POS is stored in a configuration file named "SELLmatix POS.cfg". This file resides in the SELLmatix POS working directory, and a separate configuration file is used for each SELLmatix POS configuration.

This file is a text file which can be edited with a text editor such as Notepad. This file is similar in design to .ini files used by older versions of Windows and is made up of sections which are named with the name appearing on a line by itself, and enclosed in square brackets. For example, [System]

In each section of this file there can be a number of entries which are made up of a "Keyword=" entry at the beginning of a line, followed by various data. The data which follows the "Keyword=" entry depends on the particular keyword.

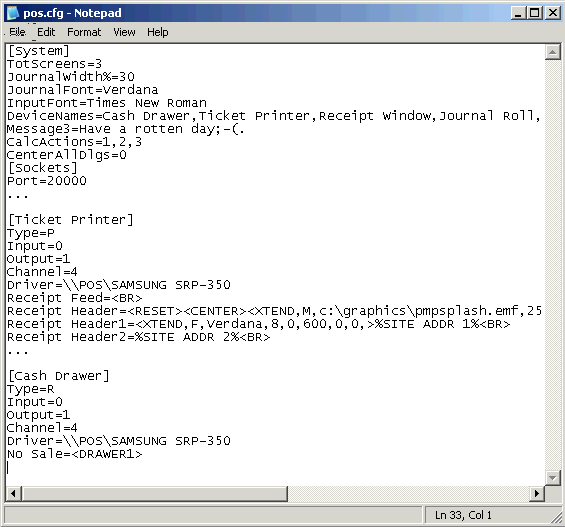
Lines in the "SELLmatix POS.cfg" file which begin with a hash character"#", are considered comments and are ignored by SELLmatix POS. An excerpt from a "SELLmatix POS.cfg" file may look like this:-

Not everything in the "SELLmatix POS.cfg" should be edited using a text editor such as Notepad. This document is not a comprehensive list of every type of data which may appear in the "SELLmatix POS.cfg" file, but rather a guide to areas which you may wish to modify for various reasons. In general, if you are not sure what something does, then leave it alone.

Back to top


Warnings
  1. If you are editing and saving changes to the "SELLmatix POS.cfg" file manually, the file must be saved in UNICODE. If using Notepad, make sure that you use UNICODE encoding. Terrible things will happen if you use ANSI encoding or any other type of encoding when saving the "SELLmatix POS.cfg" file.

  2. Make sure that you save an original copy of the "SELLmatix POS.cfg" in a different directory before editing this file, in case you make a mistake which causes SELLmatix POS run in an undesired manner.

  3. Most options on the Tools Menu of SELLmatix POS, save their settings by making entries in this "SELLmatix POS.cfg" file. If you open a copy of "SELLmatix POS.cfg", make changes on the Tools Menu of SELLmatix POS and then save the changes you have made in the copy of "SELLmatix POS.cfg" that is open in Notepad, the changes you have made on the Tools Menu will be lost.

  4. Case is significant in the "SELLmatix POS.cfg" file. The character string "DeviceNames" is NOT the same as "Devicenames" or "DEVICENAMES".

Back to top

The [System] Section
The [System] Section of "SELLmatix POS.cfg" contains information which applies to SELLmatix POS in general, and also tells SELLmatix POS about which devices are installed and used in a particular configuration.

The most likely change that you will need to make to the [System] Section of the "SELLmatix POS.cfg" file is in the:-
DeviceNames=

entry. This entry contains the names of various "devices" used by SELLmatix POS. The data following the "=" signs contains a list of device names which must match with the name of a section appearing later in the "SELLmatix POS.cfg" file. For example, if the following entry appears:-
DeviceNames=Receipt Window,Journal Roll,Ticket Printer,Scanner,Cash Drawer
then there need to be other sections in the "SELLmatix POS.cfg" file for each of the devices, such as:-
[Receipt Window]
...

[Journal Roll]
...

[Ticket Printer]
...

[Scanner]
...

[Cash Drawer]
...

and so forth.

Note that the Device Names [Receipt Window] and [Journal Roll] are internal device names which refer to the sale display on the right hand of the SELLmatix POS main screen when processing sales.

If you are configuring a new device to work with SELLmatix POS, then you will need to create a name for the device, add it to the [DeviceNames] Section of the "SELLmatix POS.cfg" file, and create a section with the same name enclosed in square brackets for that device in the "SELLmatix POS.cfg" file.

Note that spaces in the [DeviceNames] section of the [System] Section, and in later sections are significant. Add or remove spaces in the wrong places, and things won't work.

Back to top


Device Sections
For each device which SELLmatix POS uses, it needs to know certain information about how to configure that device. This information appears in the device section for each device. For each device, the following information is necessary.

Type=

This entry tells SELLmatix POS how to handle the device. Valid entries are:-
  • 'W' = Window on the display. This is only used internally by SELLmatix POS for the Journal and Receipt part of the display and should not be used elsewhere.
  • 'S' = Device handled through Serial or Parallel port. Where this option is used, one of the Comms Channels must be set up to handle the device on the Tools Menu.
  • 'P' = Printer controlled through a Windows Printer Driver. Output to this device is handled internally through calls to GDI. Such printers can reside anywhere on a local LAN as shared printers, or can be a local printer.
  • 'R' = Raw output to Windows printer. This option is designed for controlling Cash Drawers which may be connected to a Ticket Printer which in turn is connected to a USB Port, or somewhere on the Local LAN as a shared Printer. When this option is used, output to the device bypasses GDI and sends control codes directly to the printer.
  • 'F'= File on disk. Output to these devices is written to a file on disk.
  • 'D'= Call to a DLL (Dynamic Link Library).
  • Input=

    Valid entries are '0' (Zero Char) to indicate that the device does not generate input to SELLmatix POS or '1' (One Char) to indicate that the device does generate input to SELLmatix POS.

    Devices such as Barcode Scanners, Electronic Scales etc. do generate input to SELLmatix POS. Devices such as Cash Drawers, Printers or Pole Displays generally do not generate input to SELLmatix POS.

    Output=

    Valid entries are '0' (Zero Char) to indicate that the device does not receive output from SELLmatix POS or '1' (One Char) to indicate that the device does receive output from SELLmatix POS.

    Devices such as Barcode Scanners, etc. do not receive output from SELLmatix POS. Devices such as Cash Drawers, Printers or Pole Displays generally do receive output from SELLmatix POS.

    Some devices such as Electronic Scales both send information to, and receive information from SELLmatix POS.

    Channel=

    This normally refers to which Comms Channel SELLmatix POS uses to interface with the device. SELLmatix POS is able to control 4 serial or parallel ports at the same, sending and receiving information from each of these devices. There is no relationship between the port number (eg. COM1, COM3, LPT2) etc. applies to a particular Channel as this can be configured on that Com Channel.

    Driver=

    This is normally the name of the driver used to control this device. With Windows printers, this is the name of the printer.

    Filter=

    Most output formatting specified in the "SELLmatix POS.cfg" file is made up of generic tags which indicate the type of feature desired. This for example would be commands such as <BR> to indicate that the device should perform a line break, or <RED> to indicate that a device should print in red. The actual commands which tell a specific device to perform these functions vary widely for each hardware device, so SELLmatix POS uses a separate Filer file to translate these generic commands into the actual command codes which control the device. This is the name of the file containing those filter translations. Typically the filter files reside in the \drivers subdirectory of directory containing the SELLmatix POS programs. By default C:\Program Files\himatix\SELLmatix\POS\Drivers

    Back to top


Device Input Filters
It is very unlikely that you need to understand this section, unless you are doing some really fancy interfacing, but if you are interested, then read on. The section on Output events is however quite important.

In the device section for each device which provides input, one or more input filter entries may appear. They apply only to devices which generate input to SELLmatix POS. These input filters are useful for devices which may generate different types of input depending on what the data contains.

Such devices may supply a stream of data which is incomplete, or which contains more than one particular code. For example, a scanner which has scanned a code such as 9310077256011 may pass this data to SELLmatix POS in more than one packet. This data could come through as "9310" in the first packet, followed by a second packet containing "077256011". In such cases, SELLmatix POS needs to know to combine the two packets, and treat them as one item. Fortunately, devices such as scanners typically send a particular character to indicate the end of a scan. In most (but not all) cases this is character code 13 (which is a carriage return). SELLmatix POS uses the input filter called "Endflag=" to specify the code which indicates the end of an input stream which needs to be handled as a unit.

In other cases, input from a scanner may contain data which should be ignored by SELLmatix POS. Usually devices such as scanners can be configured so that they send output in the manner required by the POS system, but often this is complicated involving a lot of different codes to scan, dip switches to set or using other configuration utilities, and it may be easier to configure SELLmatix POS than the actual device.

One example is barcode scanners which prefix the data sent with the symbology of the barcode they have scanned. If the scanner reads a barcode printed in UPC/EAN symbology, it may prefix the barcode with an "AQ" prefix while if a Code 39 barcode was scanned, it may prefix the data with a "ZR" prefix. These are merely examples. SELLmatix POS can be configured to ignore leading Alpha Characters by setting the "IgnoreLeadingAlpha=" entry to 1, or to completely ignore Alpha Characters by setting the "NumericOnly=" entry to 1.

Another issue is that a barcode scanner may generate a number of different type of data such as the barcode of a product being purchased, a customer account number from a customer card, or a clerk number for a clerk that was logging in. SELLmatix POS needs to have some means of identifying the type of input from what the data contains.

In this case, other entries can be set to flag the type of data from a prefix on the the barcode scanned so that you can specify that Customer Numbers are recognised by a certain sequence of characters appearing a certain offset from the beginning of the barcode.

Another instance that occurs frequently is where a barcode contains both a product code as well as a price. You have probably seen Electronic Deli scales in a supermarket, where you buy a piece of Swiss Cheese, the cheese is weighed on the scale, and the scale produces a label containing a barcode and description. When you reach the check-out, the POS scans the barcode, and knows that the product is Swiss Cheese as well as knowing the price for the amount you have purchased. In this case, the barcode contains both the PLU number for Swiss Cheese, as well as the price to be charged. In such cases, SELLmatix POS needs to know which characters in the barcode to interpret as the PLU number, and which numbers to interpret as the price.

Most of these settings for scanners and scales can be configured in SELLmatix POS on the Tools menu, but if you are working with some strange new device, it can probably be configured by manually editing the input filters in "SELLmatix POS.cfg". You may find it interesting to look at the entries written for Scales and Scanners according to the options set on the Tools Menu, but for very difficult cases, you may need to bribe one of our programmers with bottles of Cognac for assistance.

Back to top