Overview
| PocketPos Display Configuration | |
|---|---|
| Links on this Page Overview
|
|
| Overview |
|
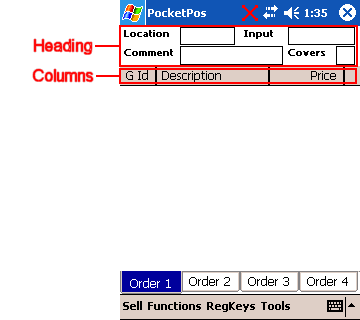
PocketPos does not use touch buttons in the same way as SELLmatix POS, due to the limited amount of space on a Pocket PC
display. Instead PocketPos uses Menus for selling items. We think this is interesting, because menus on computer systems originally took their names from menus in Chinese Restaurants where the Chefs did not understand English, and the customers did not understand Chinese, but everyone could look up "Number 27" and know what it was. Using Menus in PocketPos allows for the First level of options on the Sell Menu to be equivalent to the Pages in a restaurant Menu, and then the next level to be the items appearing on that page of the menu. It is a simple, fast, elegant solution, and has one other benefit... When menu items change, they are automatically updated in PocketPos, and the Pocket PC does not need to be reconfigured. This means that there is very little configuration that needs to be done on PocketPos, however, you can change the layout of the sale header at the top of the screen, as well as the columns showing items on a sale. |
| Configure Sale Header | ||||||||||||||||||||||||||||||||||
|
The format of the Sale Header is controlled by entries in the [Display] Section of the configuration file, "PocketPos.cfg" as follows:-
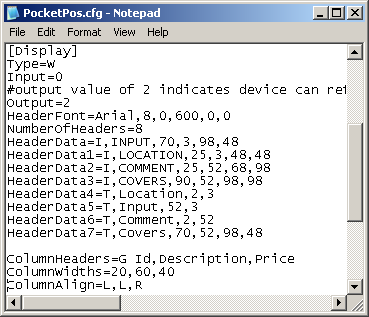 The entries in this section are as follows:- Type= Must always be set to "W". Input= Always set to "0" (zero). Output= Always set to "2". HeaderFont= Font for text displayed in header with 6 parameters separated by commas, being:-
HeaderDataN= Information about the data to be displayed with parameters as follows:-
| ||||||||||||||||||||||||||||||||||
| Configure Sale Columns |
|
The columns in the sale display are configured by entries in the [Display] Section of the configuration file, "SELLmatix POS.cfg". Normally these appear below the sale header configuration lines in the display section, and an example is as follows:-
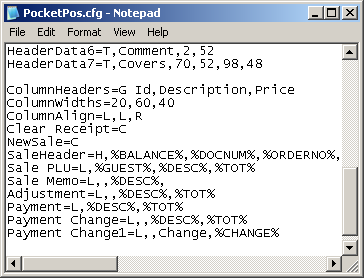 The number of columns displayed is automatically calculated from the number of entries in the ColumnHeaders, ColumnWidths and ColumnAlign entries. If you wish to have 3 columns, for example, then you should have 3 fields in each of these entries, separated by commas. The entries in this section are as follows:- ColumnHeaders=contains the headings that appear at the top of the columns, with each column separated by a comma. ColumnWidths=contains the number representing the width of each column, with each column separated by a comma. The units used are added to calculate the total number of units, and in the example the total number of units is 120. In this example the first column is 10/120 th of the total width available. Note that the total width of the column display is reduced by the width of a vertical Scroll Bar, however, the scroll bar only appears when necessary. ColumnAlign=contains the alignment flags for each of the columns, with each column separated by a comma. Valid Values are "L"eft, "C"enter, and "R"ight. Clear Receipt=must always be set to "C". NewSale=must always be set to "C". SaleHeader=must always be set to "H".
Sale PLU= The first field must always be an "L". If no data is to be displayed in a column, such as in the "Sale Memo=" entry in the example, then this should be indicated by leaving the field name blank and inserting a comma. In this example, the first and second column for a memo would contain nothing, and the Description would contain the %DESC% field. The Field names that can be used are as follows. These fieldnames must have a leading and trailing "%" character. The FieldNames which can be used is the columns are the same as the fieldnames in the Line Dataset Variables used in other POS output. For a list of Line Dataset Variables, Click Here |