ORDER PRINTER CONFIG
Links on this Page
Overview
Edit Order Layout
Print Formatting
Standard Format Commands
XTEND Graphics Commands


Overview
Order printing is used in a restaurant or bar environment, and when orders are taken by waiters using SELLmatix POS or PocketPos, and the operator uses the "Process Order" function, the order is sent to SELLmatix Control which then prints the order on the various kitchen and bar printers.

SELLmatix supports up to 9 different Order Devices, which are notified when an order is taken. The device which is notified when an item is ordered, is specified in the product record. In this way, main meals can be printed on one order printer, while deserts and drinks printed on other printers.

Configuration information for SELLmatix Control is stored in the file "SELLmatix Control.cfg" which resides in the directory where your SELLmatix Data files are stored.

This file is a Unicode text file which can be edited with a text editor such as Notepad. This file is similar in design to .ini files used by older versions of Windows and is made up of sections which are named with the name appearing on a line by itself, and enclosed in square brackets. For example, [System]

In each section of this file there can be a number of entries which are made up of a "Keyword=" entry at the beginning of a line, followed by various data. The data which follows the "Keyword=" entry depends on the particular keyword.

Lines in the configuration file which begin with a hash character"#", are considered comments and are ignored by SELLmatix. An excerpt from a pos.cfg file may look like this:-
Back to top


Edit Layout
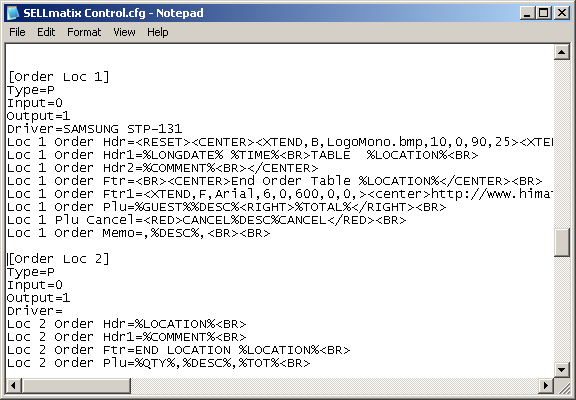
To change the layout of the orders printed by SELLmatix Control, you will need to edit the relevant section of the "SELLmatix Control.cfg" file using a text editor such as Notepad. An example showing the relevant section is as follows:-

There is a separate section of the config file for each order printers. Often different models of printers are used at different locations, and this enables appropriate printer control codes to be used.

Order Printing Script

You will need to scroll down through the file to find the relevant section, which is named

[Order Loc N]
where "N" is the location number of the order printer. The first few entries in the section are modified when you select the Account Printer, and do not need to be changed here.

There are five parts of this section that you can modify to control the appearance of the accounts which are printed. In all cases "N" refers to the location number of the order printer.

The "Loc N Order Hdr", and "Loc N Order Ftr" are printed at the top and bottom respectively, of each order printout.

"Loc N Order Plu" controls output for each item on the order which is a product that has been ordered.

"Loc N Order Memo" controls output for each line on the order that is a free form memo or comment. Where supported by the printer, it is a good idea for this to be printed in a different color so that it stands out. These are likely to be special instructions to the kitchen.

"Loc N Order Cancel" controls output for items which have previously been ordered, with an order being printed, and the order is subsequently cancelled. These lines should be formatted so that they stand out, as the kitchen staff may have already started preparing the order.

Each of these lines can optionally have 10 different lines, the first being shown with a numeric suffix, the additional lines with a numeric suffix from 1-9. These lines are processed in numeric order, but processing stops for that entry if a numeric suffix is not found.

If for example, there is no line suffix for line 4, then lines with suffixes of 5-9 will not be processed even if they exist.

Data which appears to the right of the = (equals) sign in the entry consist of a combination of the following:-

Back to top

Print Formatting
The capability of printers used in Point of Sale systems varies very widely. Some printers can print only a one single pitch font and have formatting capabilities no greater than performing a carriage return and line feed. Others can print photo quality graphics. In addition to the capabilities the print quality varies very widely.

Many formatting commands available in SELLmatix, are not available on some printers. Where possible, SELLmatix tries to emulate functions if they are not available on the printer you are using. The SELLmatix samples are designed to produce "acceptable" output on as wide a range of printers as possible, but they are not optimised for any particular device. There is a very good chance that you can greatly improve the appearance of your accounts and receipts by refining and testing different formatting options.

There are two basic types of printer which can be used. One type uses raw output from SELLmatix that directly controls the printer. Standard commands only are able to be used for these printers. The other type of printer uses a Windows driver. These printers can use the standard commands as well as the "XTEND"ed formatting commands. Given the choice, always use Windows printer drivers if they are available, even if the device does not have many graphics capabilities. At the very least, this will allow you to share that printer and have it used by other terminals.

Back to top


Standard Format Commands
<BEEP> Command
The <BEEP> command sounds the buzzer on the device.

<BR> Command
After executing the <BR> command, output continues on the next line of the device starting from the left hand column. Normally this command performs a carriage return/line feed combination.

<B> and </B> Commands
The <B> and </B> Commands turn bold print on and off respectively.

<HALFCUT> Command
This command performs a partial paper cut on the device at the current printing position.

<FULLCUT> Command
This command performs a full paper cut on the device at the current printing position.

<INVERT> and </INVERT> Commands
The <INVERT> and </INVERT> Commands turn inverted (upside down) print on and off respectively.

<I> and </I> Commands
The <I> and </I> Commands turn italic print on and off respectively.

<U> and </U> Commands
The <U> and </U> Commands turn underlined print on and off respectively.

<CENTER> and </CENTER> Commands
After executing The <CENTER> command, text output will be centered horizontally on the paper. This command can be cancelled by a <LEFT> command , a <RIGHT> command or an </CENTER> command.

<RIGHT> and </RIGHT> Commands
After executing The <RIGHT> command, text output will be right aligned horizontally on the paper. This command can be cancelled by a <LEFT> command , a <CENTER> command or an </RIGHT> command.

<RESET> Command
This command restores the device to power on defaults.

Back to top


XTEND Graphics Commands
There are a number of eXTENDed graphics commands which can be used to output to devices such as ticket printers which operate using Windows Drivers. These features are not available on other devices unless special raw drivers are created.

Not all printers that use Windows Drivers support these graphics functions. In particular, devices that use the Generic/Text Only drivers do not support these features. If a feature is not supported by the Windows driver, then output is not generated for that feature.

When printing to a normal Windows printer, the software is able to interrogate the Windows printer driver to determine the width and height of the paper, because the page size is known. Scaling can then take place in the software.

With receipt printers however, which operate on a roll of paper, the page length is unknown to the software, and so normal measurements do not work, particularly in the Y axis. For example, an image that prints at the bottom of a receipt will always print a known distance from the top of the page on a page printer, but on a receipt printer the distance from the top of the page depends on how many items are purchased on the sale.

In order to handle this issue in as device independent a manner as possible, SELLmatix POS treats all coordinates as being a percentage of the printable width of the device. Hence, an X coordinate of 25 means 25% of the printable width of the printer from the left hand side, and a Y coordinate of 67 means a location down the page equal to 67% of the printable width. The printable width is calculated at the time the printing takes place.

Not all Windows printer drivers are equal, so some fine tuning may be required to suit a particular printer. Graphics that look great on some printers are horrible on others.

eXTENDed print commands are listed in the table below. To see a sample of the function output, hover over it's link with the mouse. For more information on the command, click on it's link.

Print Function: Sample:

 
Note: The above "samples" assume a blue pen color and a yellow brush color for illustration purposes

Back to top