VALIDATE TRANSACTION POSTING
Overview
Overview

Validation Steps
Testing Directory Structure
Export from Accounting Software
Process Sample Data
Test Import


Overview
There are literally millions of different ways that SELLmatix and your accounting software can be set up. In order for it to work properly correct settings have to be used in both SELLmatix and your accounting software. For anything more than the most trivial setup, the chances that you will have all the entries set up correctly the first time, are very small.

Before relying on the accuracy of the sales postings in your setup, you should validate your setup with test data to make sure that all the transactions you will use are being posted correctly, make modifications where necessary, and then test again. Whenever you make a significant change to your configuration, you need to validate that the changes are working correctly before using the new configuration to process live data.

Trying to skip the validation process to save time is self defeating, because if there are errors, you will then need to not only correct the way that postings are made, but also reverse all the errors in the data posted.

Systematic Approach
One problem people encounter when validating data is that they try to test too many things at the same time, and when a problem occurs, they don't know which one of the things they have tested caused the problem. Working systematically and testing one thing at a time, ends up saving time.

Before validating, make a clean copy of both your accounting data and your SELLmatix data.

At the beginning of each test, start over by copying the clean data and working with that clean copy. Otherwise, you will not know if a problem was caused by what you have just tested, or by something in a previous test.
Back to top


Test Directory Structure
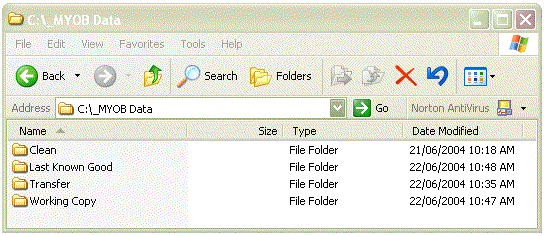
Create a new working directory which contains copies of the data files. The structure should be as follows:-

The Transfer directory will contain working copies of files which are exported from one application and imported into another.

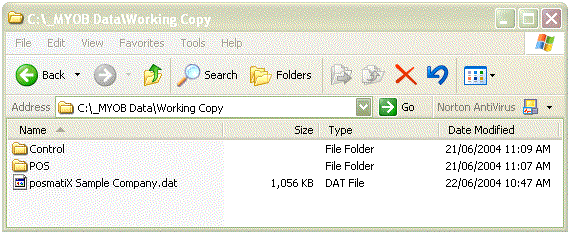
The Clean directory should contain original copies of the files. The working Copy should contain copies of the data files currently being tested, and the Last Known Good should contain copies of the latest versions which are known to work correctly. Each of these directories contain the following:-

Back to top


Export from Accounting Package
  1. Check that the products and customers are correct in the accounting system.
  2. Export the products from the Accounting System and save in the Transfer Directory. In the case of MYOB, it is easiest to Export Items with "Tab-Delimited" format where the first record is a Header Record, but if you plan to use other options then you should test the other options.
  3. Import the products into SELLmatix and then view the products to check that the data has appeared correctly. If not, then examine the data exported by MYOB in a spreadsheet such as Excel or OpenOffice, and try to determine what changes are needed to the import template to correct the problem. Make changes to the template, restore the data files from the Last Known Good directory and try the import again. Repeat this procedure until the products import correctly.
  4. When you are happy that the products are importing correctly, copy the data files to the Last Known Good directory.
  5. If you plan to have SELLmatix process sales which are charged to a customer account, Perform the same procedure with Customers until you are satisfied that the customer data has been imported into SELLmatix Correctly.
Back to top

Process Sample Data
  1. Check that the master Files are correct in the Edit Product Screens of SELLmatix. If not, go back and check the import routines.
  2. If running SELLmatix Control and POS, send everything to the POS, including full Products, Customers, Finalisations, Departments, Clerks, Tax Rates etc. In each case check the option to Clear existing records at the POS.
  3. Clear existing totals at the POS. This can be done by keying 1000 <Command>
  4. Clear existing transactions at the POS. This can be done by keying 1001 <Command>
  5. Run a Day Z-Read, and verify that the amounts are all zeros.
  6. Process 2 sales for each finalisation type you are using, and make sure to print receipts for later checking. If you will be allowing customers to charge sales to their account, process 2 charge sales to customers.
  7. Process a Day Z-Read, and verify that the finalisation totals match with the amounts on the receipts. Also check that the items sold have posted the sale values to the correct departments.
  8. If there are errors, then check the product, customer and department details to ensure that they are correct, and retest by copying the data files from the Last Known Good Configuration and repeating the steps in this section.
  9. If you are running SELLmatix Control and SELLmatix POS, delete the tran.csv file from the Control working directory so that there are no old transactions which interfere with the test data. Then run Control and Collect Sales from the POS.
  10. Export the transaction from SELLmatix in the format required.
  11. If everything is working correctly at this point, copy the data files to the Last Known Good Directory. If there are errors at this point copy the data from the Last Known Good Directory and correct the problems before proceeding.
Back to top

Test Import
  1. At this stage, you should have sample transaction data which has been exported from SELLmatix in the Transfer Directory, and the Products and Customers in the accounting system should match with the details in SELLmatix.
  2. If at all possible, you should have some sample transactions which have been processed in the accounting package which are similar to transactions you can process in SELLmatix, which have then been exported from the accounting package. Some packages such as MYOB allow this while other packages do not. Some versions of QuickBooks do not allow you to export transactions. If you are able to export transactions from the accounting package then this can be useful to compare with transactions exported from SELLmatix.
  3. Try to import the SELLmatix transactions into the accounting package. Take particular note of any errors which are generated by the accounting package during the import.
  4. If there are no errors generated, skip ahead to step 6.
  5. Load the transactions exported from SELLmatix into a spreadsheet such as Excel or OpenOffice and edit the data so that it imports cleanly into the accounting software. Error message are useful to determine what changes need to be made. It is also useful to compare the transactions you are trying to import with sample transactions exported from the accounting program to decide what changes to try.

    Try to import the modified data into the accounting package again. Note that the data in the accounting package at this stage is likely to be wrong, because some of the transactions from the previous import may have posted while other transaction may not have imported correctly. The objective here is to determine what changes need to be made to the raw data, in order to have it import cleanly into the accounting package without errors.

    Repeat this step as needed until the data imports cleanly into the accounting package.

  6. Restore the accounting database from the Last Known Good directory. This database should be "clean" without any imported transactions. When you import transactions, they should import "clean' without errors being generated, but you don't know if the postings are correct.
  7. Import the data which has been modified in the spreadsheet so that it imports cleanly, and check the postings to make sure they are correct, according to the sales processed in SELLmatix. Change the data using the spreadsheet to make the postings correct, but ignore the way that SELLmatix exports the data. Restore the accounting data from the Last Known Good Directory before each attempt to import the data modified in the spreadsheet.
  8. By now, you should have data which has been modified in the spreadsheet which imports cleanly into the accounting package, and accurately reflects the transactions which were processed in SELLmatix. However the data exported by SELLmatix using the transaction template may not match the data you have edited in the spreadsheet which does post correctly.
  9. Make changes to the transaction export template in SELLmatix and export the transactions from SELLmatix so that the exported data matches the format which was modified in the spreadsheet.
  10. Save the changes to the transaction export template to the Last Known Good directory, and re-test everything from the start. Repeat as necessary until you are sure that all transfers and postings work correctly. Save the export templates which have been verified correct, clear the transactions from SELLmatix and you are ready to run live.
Back to top